This article has been localized into Chinese by the community.
使用WPF TabControl
WPF标签栏控制功能能够实现将界面拆分为多个分区。 用户可以通过点击通常位于界面顶部的页面标签,访问对应的页面分区。页面控制被广泛的运用在Windows软件甚至其自身系统的界面上, 例如运用在文件及文件夹的对话框等等一些界面上。
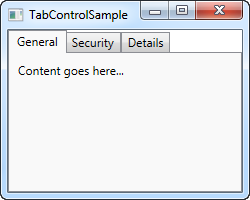
像其它WPF控制功能一样, 标签栏控制功能非常易于上手。以下是一个非常基础的例子:
<Window x:Class="WpfTutorialSamples.Misc_controls.TabControlSample"
        xmlns="http://schemas.microsoft.com/winfx/2006/xaml/presentation"
        xmlns:x="http://schemas.microsoft.com/winfx/2006/xaml"
        Title="TabControlSample" Height="200" Width="250">
    <Grid>
        <TabControl>
            <TabItem Header="General">
                <Label Content="Content goes here..." />
            </TabItem>
            <TabItem Header="Security" />
            <TabItem Header="Details" />
        </TabControl>
    </Grid>
</Window>
如你所见,每一个分栏表现为一个标签栏组件。组件上的文字可以通过标题属性进行设置。标签栏组件附属于内容控制类,这就意味着如果标签栏启用状态下,你可以自定义标签栏页面显示中的每一个部分。(如图所示)我在这个例子中我仅用了一个标签,但是如果你想在选项卡中放置多个标签栏控件,你只需要在其中增加多个子控制组件即可。
自定义标头
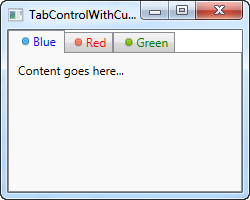
再次重申,当你想自定义标签栏的外观时,WPF是非常具有灵活性的,其中的内容可以用任何你喜好的风格形式进行表达。因此,标签栏的标题也一样,标签栏的属性可以被设置成任何你喜欢的形式,我们将会在下一个例子里解释其优势:
<Window x:Class="WpfTutorialSamples.Misc_controls.TabControlWithCustomHeadersSample"
        xmlns="http://schemas.microsoft.com/winfx/2006/xaml/presentation"
        xmlns:x="http://schemas.microsoft.com/winfx/2006/xaml"
        Title="TabControlWithCustomHeadersSample" Height="200" Width="250">
    <Grid>
        <Grid>
            <TabControl>
                <TabItem>
                    <TabItem.Header>
                        <StackPanel Orientation="Horizontal">
                            <Image Source="/WpfTutorialSamples;component/Images/bullet_blue.png" />
                            <TextBlock Text="Blue" Foreground="Blue" />
                        </StackPanel>
                    </TabItem.Header>
                    <Label Content="Content goes here..." />
                </TabItem>
                <TabItem>
                    <TabItem.Header>
                        <StackPanel Orientation="Horizontal">
                            <Image Source="/WpfTutorialSamples;component/Images/bullet_red.png" />
                            <TextBlock Text="Red" Foreground="Red" />
                        </StackPanel>
                    </TabItem.Header>
                </TabItem>
                <TabItem>
                    <TabItem.Header>
                        <StackPanel Orientation="Horizontal">
                            <Image Source="/WpfTutorialSamples;component/Images/bullet_green.png" />
                            <TextBlock Text="Green" Foreground="Green" />
                        </StackPanel>
                    </TabItem.Header>
                </TabItem>
            </TabControl>
        </Grid>
    </Grid>
</Window>
本例中标记量可能有点过多,但是一旦你深入研究,你可能会发现其实它非常简单。 每个选项卡现在都有一个TabControl.Header元素,它包含一个StackPanel,而StackPanel又包含一个Image和一个TextBlock控件。 这让我们可以在每个选项卡上放置一个图像,并自定义文本的颜色(我们可以将其设置为粗体,斜体或其他尺寸)。
控制TabControl
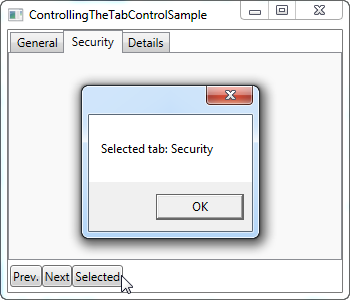
有时您可能想要以编程方式选择控制哪个选项卡,或者获得所选选项卡的一些信息。WPF TabControl控件有几个属性可以实现上述需求,例如SelectedIndex和SelectedItem。在下一个示例中,我在第一个示例中添加了几个按钮,使得我们控制TabControl:
<Window x:Class="WpfTutorialSamples.Misc_controls.ControllingTheTabControlSample"
        xmlns="http://schemas.microsoft.com/winfx/2006/xaml/presentation"
        xmlns:x="http://schemas.microsoft.com/winfx/2006/xaml"
        Title="ControllingTheTabControlSample" Height="300" Width="350">
    <DockPanel>
        <StackPanel Orientation="Horizontal" DockPanel.Dock="Bottom" Margin="2,5">
            <Button Name="btnPreviousTab" Click="btnPreviousTab_Click">Prev.</Button>
            <Button Name="btnNextTab" Click="btnNextTab_Click">Next</Button>
            <Button Name="btnSelectedTab" Click="btnSelectedTab_Click">Selected</Button>
        </StackPanel>
        <TabControl Name="tcSample">
            <TabItem Header="General">
                <Label Content="Content goes here..." />
            </TabItem>
            <TabItem Header="Security" />
            <TabItem Header="Details" />
        </TabControl>

    </DockPanel>
</Window>
using System;
using System.Windows;
using System.Windows.Controls;
namespace WpfTutorialSamples.Misc_controls
{
public partial class ControllingTheTabControlSample : Window
{
public ControllingTheTabControlSample()
{
InitializeComponent();
}
private void btnPreviousTab_Click(object sender, RoutedEventArgs e)
{
int newIndex = tcSample.SelectedIndex - 1;
if(newIndex < 0)
newIndex = tcSample.Items.Count - 1;
tcSample.SelectedIndex = newIndex;
}
private void btnNextTab_Click(object sender, RoutedEventArgs e)
{
int newIndex = tcSample.SelectedIndex + 1;
if(newIndex >= tcSample.Items.Count)
newIndex = 0;
tcSample.SelectedIndex = newIndex;
}
private void btnSelectedTab_Click(object sender, RoutedEventArgs e)
{
MessageBox.Show("Selected tab: " + (tcSample.SelectedItem as TabItem).Header);
}
}
}
如您所见,我简单地在界面的下半部分添加了一组按钮。前两个允许选择当前控件的上一个或下一个选项卡,而最后一个选项卡将显示有关当前所选选项卡的信息,如屏幕截图所示。
前两个按钮使用SelectedIndex属性来确定位置,然后减去或添加一个值,确保新索引不为负且不高于可用项的总数。 第三个按钮使用SelectedItem属性来获取对所选选项卡的引用。 正如您所看到的,我必须将其类型转换为TabItem类以获取header属性,因为SelectedProperty默认是object类型。
小结
当您需要在对话框中清晰的分离或者没有足够的空间来容纳您想要的所有控件时,TabControl非常适合。 在接下来的章节,我们将研究TabControl的各种用法。