The community is working on translating this tutorial into Indonesian, but it seems that no one has started the translation process for this article yet. If you can help us, then please click "More info".
ListView, data binding and ItemTemplate
In the previous article, we manually populated a ListView control through XAML code, but in WPF, it's all about data binding. The concept of data binding is explained in detail in another part of this tutorial, but generally speaking it's about separating data from layout. So, let's try binding some data to a ListView:
<Window x:Class="WpfTutorialSamples.ListView_control.ListViewDataBindingSample"
        xmlns="http://schemas.microsoft.com/winfx/2006/xaml/presentation"
        xmlns:x="http://schemas.microsoft.com/winfx/2006/xaml"
        Title="ListViewDataBindingSample" Height="300" Width="300">
    <Grid>
		<ListView Margin="10" Name="lvDataBinding"></ListView>
	</Grid>
</Window>
using System;
using System.Collections.Generic;
using System.Windows;
namespace WpfTutorialSamples.ListView_control
{
public partial class ListViewDataBindingSample : Window
{
public ListViewDataBindingSample()
{
InitializeComponent();
List<User> items = new List<User>();
items.Add(new User() { Name = "John Doe", Age = 42 });
items.Add(new User() { Name = "Jane Doe", Age = 39 });
items.Add(new User() { Name = "Sammy Doe", Age = 13 });
lvDataBinding.ItemsSource = items;
}
}
public class User
{
public string Name { get; set; }
public int Age { get; set; }
}
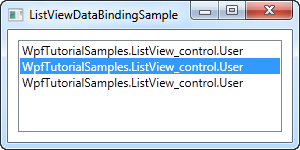
}We populate a list of our own User objects, each user having a name and an age. The data binding process happens automatically as soon as we assign the list to the ItemsSource property of the ListView, but the result is a bit discouraging:

Each user is represented by their type name in the ListView. This is to be expected, because .NET doesn't have a clue about how you want your data to be displayed, so it just calls the ToString() method on each object and uses that to represent the item.
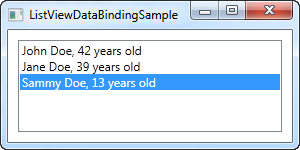
We can use that to our advantage and override the ToString() method, to get a more meaningful output. Try replacing the User class with this version:
public class User
{
	public string Name { get; set; }

	public int Age { get; set; }

	public override string ToString()
	{
		return this.Name + ", " + this.Age + " years old";
	}
}
This is a much more user friendly display and will do just fine in some cases, but relying on a simple string is not that flexible. Perhaps you want a part of the text to be bold or another color? Perhaps you want an image? Fortunately, WPF makes all of this very simple using templates.
ListView with an ItemTemplate
WPF is all about templating, so specifying a data template for the ListView is very easy. In this example, we'll do a bunch of custom formatting in each item, just to show you how flexible this makes the WPF ListView.
<Window x:Class="WpfTutorialSamples.ListView_control.ListViewItemTemplateSample"
        xmlns="http://schemas.microsoft.com/winfx/2006/xaml/presentation"
        xmlns:x="http://schemas.microsoft.com/winfx/2006/xaml"
        Title="ListViewItemTemplateSample" Height="150" Width="350">
    <Grid>
		<ListView Margin="10" Name="lvDataBinding">
			<ListView.ItemTemplate>
				<DataTemplate>
					<WrapPanel>
						<TextBlock Text="Name: " />
						<TextBlock Text="{Binding Name}" FontWeight="Bold" />
						<TextBlock Text=", " />
						<TextBlock Text="Age: " />
						<TextBlock Text="{Binding Age}" FontWeight="Bold" />
						<TextBlock Text=" (" />
						<TextBlock Text="{Binding Mail}" TextDecorations="Underline" Foreground="Blue" Cursor="Hand" />
						<TextBlock Text=")" />
					</WrapPanel>
				</DataTemplate>
			</ListView.ItemTemplate>
		</ListView>
	</Grid>
</Window>
using System;
using System.Collections.Generic;
using System.Windows;
namespace WpfTutorialSamples.ListView_control
{
public partial class ListViewItemTemplateSample : Window
{
public ListViewItemTemplateSample()
{
InitializeComponent();
List<User> items = new List<User>();
items.Add(new User() { Name = "John Doe", Age = 42, Mail = "john@doe-family.com" });
items.Add(new User() { Name = "Jane Doe", Age = 39, Mail = "jane@doe-family.com" });
items.Add(new User() { Name = "Sammy Doe", Age = 13, Mail = "sammy.doe@gmail.com" });
lvDataBinding.ItemsSource = items;
}
}
public class User
{
public string Name { get; set; }
public int Age { get; set; }
public string Mail { get; set; }
}
}
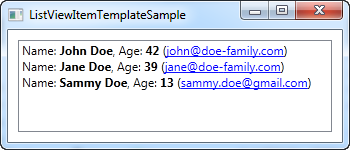
We use a bunch of TextBlock controls to build each item, where we put part of the text in bold. For the e-mail address, which we added to this example, we underline it, give it a blue color and change the mouse cursor, to make it behave like a hyperlink.
Summary
Using an ItemTemplate and data binding, we produced a pretty cool ListView control. However, it still looks a lot like a ListBox. A very common usage scenario for a ListView is to have columns, sometimes (e.g. in WinForms) referred to as a details view. WPF comes with a built-in view class to handle this, which we will talk about in the next chapter.