This article is currently in the process of being translated into Japanese (~78% done).
Panels:
The Grid - Spanning
グリッドのデフォルト動作では各コントロールは1個のセルを占めますが、ある1つのコントロールを複数のロウやカラムに置きたくなることがあります。幸運にもグリッドは添付プロパティの ColumnSpan と RowSpan でこれを簡単に行えます。このプロパティのデフォルト値は1ですが、ここに大きな値を設定して、コントロールを複数のロウやカラムにまたがって置くことが出来ます。
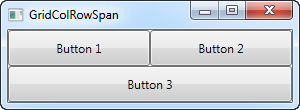
ColumnSpan プロパティを使った非常に簡単な例です。
<Window x:Class="WpfTutorialSamples.Panels.GridColRowSpan"
        xmlns="http://schemas.microsoft.com/winfx/2006/xaml/presentation"
        xmlns:x="http://schemas.microsoft.com/winfx/2006/xaml"
        Title="GridColRowSpan" Height="110" Width="300">
	<Grid>
		<Grid.ColumnDefinitions>
			<ColumnDefinition Width="1*" />
			<ColumnDefinition Width="1*" />
		</Grid.ColumnDefinitions>
		<Grid.RowDefinitions>
			<RowDefinition Height="*" />
			<RowDefinition Height="*" />
		</Grid.RowDefinitions>
		<Button>Button 1</Button>
		<Button Grid.Column="1">Button 2</Button>
		<Button Grid.Row="1" Grid.ColumnSpan="2">Button 3</Button>
	</Grid>
</Window>
二つのカラムと二つのロウを定義していて、それらは全部等分に分割しています。最初の二つのボタンはカラムを普通に使っていますが、3つ目のボタンは ColumnSpan 属性を使って2番目のロウの二つのカラムを占めています。
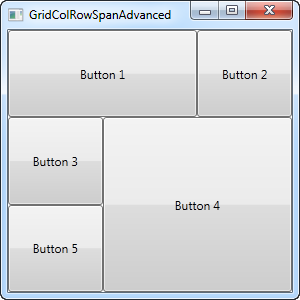
これは、パネルの組み合わせを使って同じ効果を得ることができるぐらい簡単ですが、少し発展したケースでは本当に有用です。これがどれだけパワフルなのかを見てみましょう。
<Window x:Class="WpfTutorialSamples.Panels.GridColRowSpanAdvanced"
        xmlns="http://schemas.microsoft.com/winfx/2006/xaml/presentation"
        xmlns:x="http://schemas.microsoft.com/winfx/2006/xaml"
        Title="GridColRowSpanAdvanced" Height="300" Width="300">
    <Grid>
		<Grid.ColumnDefinitions>
			<ColumnDefinition Width="*" />
			<ColumnDefinition Width="*" />
			<ColumnDefinition Width="*" />
		</Grid.ColumnDefinitions>
		<Grid.RowDefinitions>
			<RowDefinition Height="*" />
			<RowDefinition Height="*" />
			<RowDefinition Height="*" />
		</Grid.RowDefinitions>
		<Button Grid.ColumnSpan="2">Button 1</Button>
		<Button Grid.Column="3">Button 2</Button>
		<Button Grid.Row="1">Button 3</Button>
		<Button Grid.Column="1" Grid.Row="1" Grid.RowSpan="2" Grid.ColumnSpan="2">Button 4</Button>
		<Button Grid.Column="0" Grid.Row="2">Button 5</Button>
	</Grid>
</Window>
3つのカラムと3つのロウで普通は9個のセルになりますが、この例では、有効なスペースをちょうど5個のボタンで埋めるように、ロウとカラムのスパニングの組み合わせを使っています。見ればわかりますが、コントロールは、余分のカラムや余分のロウ、そしてボタン4のように両方をスパン出来ます。
このように、グリッドのカラムまたは/とロウの複数のスパニングは大変簡単です。後の記事では、もっと具体的な例で、他のグリッドのテクニックと一緒にスパニングを使います。
This article has been fully translated into the following languages:
Is your preferred language not on the list? Click here to help us translate this article into your language!