The community is working on translating this tutorial into Kannada, but it seems that no one has started the translation process for this article yet. If you can help us, then please click "More info".
ListView with a GridView
In the previous ListView articles, we have used the most basic version of the WPF ListView, which is the one without a custom View specified. This results in a ListView that acts very much like the WPF ListBox, with some subtle differences. The real power lies in the views though and WPF comes with one specialized view built-in: The GridView.
By using the GridView, you can get several columns of data in your ListView, much like you see it in Windows Explorer. Just to make sure that everyone can visualize it, we'll start off with a basic example:
<Window x:Class="WpfTutorialSamples.ListView_control.ListViewGridViewSample"
        xmlns="http://schemas.microsoft.com/winfx/2006/xaml/presentation"
        xmlns:x="http://schemas.microsoft.com/winfx/2006/xaml"
        Title="ListViewGridViewSample" Height="200" Width="400">
    <Grid>
		<ListView Margin="10" Name="lvUsers">
			<ListView.View>
				<GridView>
					<GridViewColumn Header="Name" Width="120" DisplayMemberBinding="{Binding Name}" />
					<GridViewColumn Header="Age" Width="50" DisplayMemberBinding="{Binding Age}" />
					<GridViewColumn Header="Mail" Width="150" DisplayMemberBinding="{Binding Mail}" />
				</GridView>
			</ListView.View>
		</ListView>
	</Grid>
</Window>using System;
using System.Collections.Generic;
using System.Windows;
namespace WpfTutorialSamples.ListView_control
{
public partial class ListViewGridViewSample : Window
{
public ListViewGridViewSample()
{
InitializeComponent();
List<User> items = new List<User>();
items.Add(new User() { Name = "John Doe", Age = 42, Mail = "john@doe-family.com" });
items.Add(new User() { Name = "Jane Doe", Age = 39, Mail = "jane@doe-family.com" });
items.Add(new User() { Name = "Sammy Doe", Age = 7, Mail = "sammy.doe@gmail.com" });
lvUsers.ItemsSource = items;
}
}
public class User
{
public string Name { get; set; }
public int Age { get; set; }
public string Mail { get; set; }
}
}
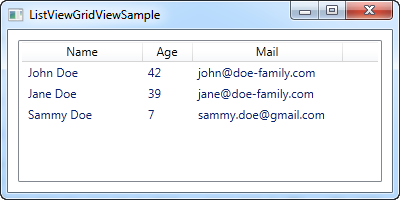
So, we use the same User class as previously, for test data, which we then bind to the ListView. This is all the same as we saw in previous chapters, but as you can see from the screenshot, the layout is very different. This is the power of data binding - the same data, but presented in a completely different way, just by changing the markup.
In the markup (XAML), we define a View for the ListView, using the ListView.View property. We set it to a GridView, which is currently the only included view type in WPF (you can easily create your own though!). The GridView is what gives us the column-based view that you see on the screenshot.
Inside of the GridView, we define three columns, one for each of the pieces of data that we wish to show. The Header property is used to specify the text that we would like to show for the column and then we use the DisplayMemberBinding property to bind the value to a property from our User class.
Templated cell content
Using the DisplayMemberBinding property is pretty much limited to outputting simple strings, with no custom formatting at all, but the WPF ListView is much more flexible than that. By specifying a CellTemplate, we take full control of how the content is rendered within the specific column cell.
The GridViewColumn will use the DisplayMemberBinding as its first priority, if it's present. The second choice will be the CellTemplate property, which we'll use for this example:
<Window x:Class="WpfTutorialSamples.ListView_control.ListViewGridViewCellTemplateSample"
        xmlns="http://schemas.microsoft.com/winfx/2006/xaml/presentation"
        xmlns:x="http://schemas.microsoft.com/winfx/2006/xaml"
        Title="ListViewGridViewCellTemplateSample" Height="200" Width="400">
    <Grid>
		<ListView Margin="10" Name="lvUsers">
			<ListView.View>
				<GridView>
					<GridViewColumn Header="Name" Width="120" DisplayMemberBinding="{Binding Name}" />
					<GridViewColumn Header="Age" Width="50" DisplayMemberBinding="{Binding Age}" />
					<GridViewColumn Header="Mail" Width="150">
						<GridViewColumn.CellTemplate>
							<DataTemplate>
								<TextBlock Text="{Binding Mail}" TextDecorations="Underline" Foreground="Blue" Cursor="Hand" />
							</DataTemplate>
						</GridViewColumn.CellTemplate>
					</GridViewColumn>
				</GridView>
			</ListView.View>
		</ListView>
	</Grid>
</Window>
Please notice: The Code-behind code for this example is the same as the one used for the first example in this article.
We specify a custom CellTemplate for the last column, where we would like to do some special formatting for the e-mail addresses. For the other columns, where we just want basic text output, we stick with the DisplayMemberBinding, simply because it requires way less markup.