This article is currently in the process of being translated into Korean (~99% done).
Grid 컨트롤
Grid는 아마 가장 복잡한 패널 유형일 것입니다. Grid에는 여러 행과 열이 포함될 수 있습니다. 각 행의 높이와 각 열의 너비를 픽셀의 절대 크기로, 사용 가능한 공간의 백분율로 또는 자동으로 정의합니다. 여기서 행 또는 열은 자동으로 크기를 조정합니다. 다른 패널이 유용하지 않을 때 Grid를 사용하십시오. 여러 열이 필요할 때 다른 패널과 함께 혼용해서 사용되는 경우가 많습니다.
가장 기본적인 형태에서 Grid는 사용자가 입력한 모든 컨트롤을 가져 와서 사용할 수있는 최대 공간을 사용하고 서로의 위에 겹쳐지게 놓습니다.
<Window x:Class="WpfTutorialSamples.Panels.Grid"
        xmlns="http://schemas.microsoft.com/winfx/2006/xaml/presentation"
        xmlns:x="http://schemas.microsoft.com/winfx/2006/xaml"
        Title="Grid" Height="300" Width="300">
    <Grid>
		<Button>Button 1</Button>
		<Button>Button 2</Button>
	</Grid>
</Window>
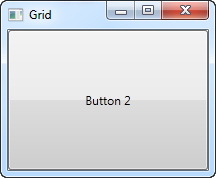
보시다시피, 마지막 컨트롤이 맨 위에 배치됩니다. 이렇게 사용하는 경우 첫 번째 버튼은 볼 수 없습니다. 대부분의 이런 상황에선 사용성이 떨어지기 때문에 공간을 나누어 사용하는데, 이 때 그리드가 매우 유용합니다. 우리는 ColumnDefinitions와 RowDefinitions를 속성을 사용하여 공간을 나눌 수 있습니다. 다음의 첫 번째 예제에서는 column 열을 사용합니다.
<Window x:Class="WpfTutorialSamples.Panels.Grid"
        xmlns="http://schemas.microsoft.com/winfx/2006/xaml/presentation"
        xmlns:x="http://schemas.microsoft.com/winfx/2006/xaml"
        Title="Grid" Height="300" Width="300">
    <Grid>
		<Grid.ColumnDefinitions>
			<ColumnDefinition Width="*" />
			<ColumnDefinition Width="*" />
		</Grid.ColumnDefinitions>
		<Button>Button 1</Button>
		<Button Grid.Column="1">Button 2</Button>
	</Grid>
</Window>
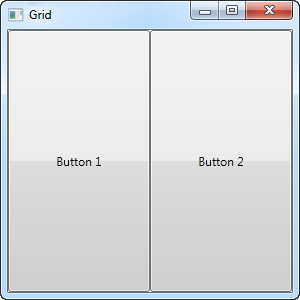
이 예제에서 우리는 간단히 사용 가능한 공간을 두 개의 열로 나누었습니다. 이 열은 "star width 별 폭 (자세한 내용은 나중에 설명합니다)"을 사용하여 공간을 똑같이 공유합니다. 두 번째 버튼을 두 번째 열 (0은 첫 번째 열, 1은 두 번째 열)에 배치하기 위해 이른바 Attached 속성을 사용합니다. 첫 번째 버튼에도 이 속성을 사용할 수 있었지만, 첫 번째 열과 첫 번째 행에 자동으로 할당되는 것이 기본이고, 이게 기대했던 바입니다.
보시다시피 컨트롤은 사용 가능한 공간을 모두 차지하고, 이것이 Grid가 자식 컨트롤을 정렬 할 때의 기본 동작입니다. 이것은 자식 컨트롤의 HorizontalAlignment 및 VerticalAlignment가 Stretch로 설정되어 있기 때문에 이렇게 동작하는 것입니다.
어떤 경우에는 컨트롤이 필요한 공간만을 차지하고 그리드에 배치하는 방법으로 사용하기를 원할 수 있습니다. 가장 쉬운 방법은 조정하려는 컨트롤에 HorizontalAlignment 및 VerticalAlignment를 직접 설정하는 것입니다. 위 예제의 수정된 버전은 다음과 같습니다.
<Window x:Class="WpfTutorialSamples.Panels.Grid"
        xmlns="http://schemas.microsoft.com/winfx/2006/xaml/presentation"
        xmlns:x="http://schemas.microsoft.com/winfx/2006/xaml"
        Title="Grid" Height="300" Width="300">
    <Grid>
		<Grid.ColumnDefinitions>
			<ColumnDefinition Width="*" />
			<ColumnDefinition Width="*" />
		</Grid.ColumnDefinitions>
		<Button VerticalAlignment="Top" HorizontalAlignment="Center">Button 1</Button>
		<Button Grid.Column="1" VerticalAlignment="Center" HorizontalAlignment="Right">Button 2</Button>
	</Grid>
</Window>
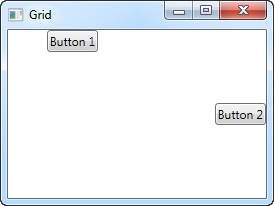
결과 스크린 샷에서 볼 수 있듯이, 첫 번째 버튼은 상단의 중앙에 배치됩니다. 두 번째 버튼은 중앙 오른쪽에 정렬됩니다.
Summary
그리드는 이 글에서 본 것보다 훨씬 많은 가능성을 가진 다재다능한 패널입니다. 나머지 부분은 다음 글에서 자세히 살펴보겠습니다.