This article is currently in the process of being translated into Korean (~96% done).
WPF 커멘드의 사용
이전의 글에서, 우리는 커멘드가 무엇인지와 커멘드가 어떻게 작동하는지에 대한 이론을 배웠습니다. 이 장에서, 우리는 실제로 커멘드를 사용자 인터페이스 요소에 할당하고 커멘드들을 모두 연결해주는 커멘드 바인딩을 만들어 봄으로서 커멘드를 어떻게 사용하는지 알아볼 것입니다.
아주 간단한 예시로 시작해 봅시다.
<Window x:Class="WpfTutorialSamples.Commands.UsingCommandsSample"
        xmlns="http://schemas.microsoft.com/winfx/2006/xaml/presentation"
        xmlns:x="http://schemas.microsoft.com/winfx/2006/xaml"
        Title="UsingCommandsSample" Height="100" Width="200">
    <Window.CommandBindings>
        <CommandBinding Command="ApplicationCommands.New" Executed="NewCommand_Executed" CanExecute="NewCommand_CanExecute" />
    </Window.CommandBindings>

    <StackPanel HorizontalAlignment="Center" VerticalAlignment="Center">
        <Button Command="ApplicationCommands.New">New</Button>
    </StackPanel>
</Window>
using System;
using System.Collections.Generic;
using System.Windows;
using System.Windows.Input;
namespace WpfTutorialSamples.Commands
{
public partial class UsingCommandsSample : Window
{
public UsingCommandsSample()
{
InitializeComponent();
}
private void NewCommand_CanExecute(object sender, CanExecuteRoutedEventArgs e)
{
e.CanExecute = true;
}
private void NewCommand_Executed(object sender, ExecutedRoutedEventArgs e)
{
MessageBox.Show("The New command was invoked");
}
}
}
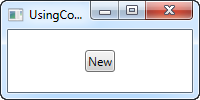
우리는 커멘드 바인딩을 CommandBindings 컬렉션에 추가함으로서 커멘드 바인딩을 정의합니다. 우리가 쓰고 싶은 그 커멘드(ApplicationCommands에서의 New command)를 두 개의 EventHandler와 함께 특정하겠습니다. 시각 인터페이스는 버튼 하나로 이루어져 있으며, 우리는 그 버튼에 Command 설정을 이용해서 커멘드를 연결했습니다.
코드 뒤에서, 우리는 2개의 이벤트를 조종합니다. WPF가 앱이 아무 동작도 하지 않을 때 특정 커멘드가 사용 가능한지를 확인하는 데 호출할 CanExecute handler는, 우리가 이 예제에선 항상 특정 커멘드가 사용 가능하기를 바라기 때문에 아주 간단합니다. 이벤트 매개변수의 CanExecute 속성을 true로 설정해 주기만 하면 됩니다.
Executed 핸들러는 단순히 커멘드가 발동되면 메시지 박스를 보여줍니다. 만약 이 예제를 실행하고 버튼을 누른다면, 당신은 메시지를 볼 수 있을 것입니다. 알아두어야 할 점은 이 커멘드는 기본 설정된 단축키가 있다는 점이고, 당신에게 이득을 가져다 줄 겁니다. 당신 키보드의 Ctrl+N으로 버튼을 누르지 않는 대신 같은 결과를 가져올 수 있습니다.
CanExecute 메서드의 사용
처음 예제에서, 우리는 CanExecute 이벤트를 단순히 true를 반환하도록 도입했습니다. 그래서 버튼은 항상 사용 가능하게 되겠죠. 그러나 모든 버튼이 항상 그런 것은 당연히 아닙니다. 많은 경우에서, 당신은 버튼이 당신의 앱의 어떤 상태에 따라서 활성화되거나 비활성화되길 바랄 겁니다.
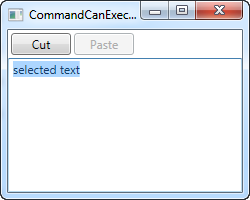
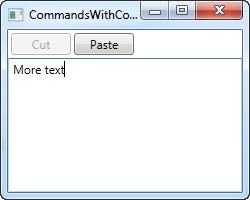
이것의 아주 일반적인 예시는 텍스트가 선택되었을 때만 잘라내기와 복사 버튼이 활성화되고, 클립보드에 텍스트가 있을 때만 붙여넣기 버튼이 활성화되길 당신이 원하는, Windows의 클립보드를 사용한 버튼의 활성/비활성 전환입니다. 이것이 바로 우리가 이 예제에서 성취할 것입니다.
<Window x:Class="WpfTutorialSamples.Commands.CommandCanExecuteSample"
        xmlns="http://schemas.microsoft.com/winfx/2006/xaml/presentation"
        xmlns:x="http://schemas.microsoft.com/winfx/2006/xaml"
        Title="CommandCanExecuteSample" Height="200" Width="250">
    <Window.CommandBindings>
        <CommandBinding Command="ApplicationCommands.Cut" CanExecute="CutCommand_CanExecute" Executed="CutCommand_Executed" />
        <CommandBinding Command="ApplicationCommands.Paste" CanExecute="PasteCommand_CanExecute" Executed="PasteCommand_Executed" />
    </Window.CommandBindings>
    <DockPanel>
        <WrapPanel DockPanel.Dock="Top" Margin="3">
            <Button Command="ApplicationCommands.Cut" Width="60">_Cut</Button>
            <Button Command="ApplicationCommands.Paste" Width="60" Margin="3,0">_Paste</Button>
        </WrapPanel>
        <TextBox AcceptsReturn="True" Name="txtEditor" />
    </DockPanel>
</Window>
using System;
using System.Collections.Generic;
using System.Windows;
using System.Windows.Input;
namespace WpfTutorialSamples.Commands
{
public partial class CommandCanExecuteSample : Window
{
public CommandCanExecuteSample()
{
InitializeComponent();
}
private void CutCommand_CanExecute(object sender, CanExecuteRoutedEventArgs e)
{
e.CanExecute = (txtEditor != null) && (txtEditor.SelectionLength > 0);
}
private void CutCommand_Executed(object sender, ExecutedRoutedEventArgs e)
{
txtEditor.Cut();
}
private void PasteCommand_CanExecute(object sender, CanExecuteRoutedEventArgs e)
{
e.CanExecute = Clipboard.ContainsText();
}
private void PasteCommand_Executed(object sender, ExecutedRoutedEventArgs e)
{
txtEditor.Paste();
}
}
}
이렇게, 우리는 몇몇 버튼과 Textbox 컨트롤이 있는 아주 간단한 인터페이스를 만들었습니다. 가장 처음 버튼은 텍스트를 클립보드로 잘라낼 것이고 두 번째 버튼은 텍스트를 클립보드에서 붙여넣을 것입니다.
코드에서는, 우리는 각각의 버튼에 대해 2개의 이벤트를 가지고 있습니다. 하나는 _Executed로 끝나는, 실제로 행동을 하는 이벤트이고, 다른 하나는 CanExecute 이벤트입니다. 각각의 이벤트에서, 당신은 행동이 실행될 지 말 지 결정하고 반환값인 CanExecute에 지정하는 약간의 논리가 적용된 것을 볼 수 있을 겁니다.
이것의 좋은 점은 버튼을 업데이트하기 위한 메서드들을 호출할 필요가 없다는 것입니다. WPF가 자동으로 앱이 쉬고 있는 상황에서 자동적으로 할 것이고 당신의 인터페이스는 항상 업데이트되어 있을 것입니다.
기본 커멘드 행동과 CommandTarget
이전의 예제들에서 보았듯이, 커멘드를 여러 개 다루는 것은 많은 메서드 선언과 매우 표준적인 논리 코드를 사용해서 코드가 길어질 수 있습니다. 아마 이것이 WPF 팀에서 당신을 위해 커멘드 몇 개를 다루도록 결심한 이유일 것입니다. 사실, 당신은 WPF Textbox가 잘라내기, 복사, 붙여넣기, 실행 취소, 다시 실행 같은 간단한 커멘드들을 자동적으로 다룰 수 있기에 이전 예제에서의 코드 차원의 것들은 모두 피할 수 있었습니다.
WPF가 TextBox 같은 텍스트 입력 컨트롤이 활성화되어 있다면 당신을 위해 Executed와 CanExecute 이벤트를 다뤄 줄 것입니다. 당신은 이전 예시에서 우리가 했던 것처럼 이 이벤트를 덮어씌워도 되지만, 당신이 기본적인 행동만 원한다면 WPF가 당신을 위해 커멘드와 TextBox 컨트롤을 연결하고 일을 하도록 놔둘 수 있습니다. 얼마나 이 예제가 간단해질 수 있는 지 봅시다.
<Window x:Class="WpfTutorialSamples.Commands.CommandsWithCommandTargetSample"
        xmlns="http://schemas.microsoft.com/winfx/2006/xaml/presentation"
        xmlns:x="http://schemas.microsoft.com/winfx/2006/xaml"
        Title="CommandsWithCommandTargetSample" Height="200" Width="250">
    <DockPanel>
        <WrapPanel DockPanel.Dock="Top" Margin="3">
            <Button Command="ApplicationCommands.Cut" CommandTarget="{Binding ElementName=txtEditor}" Width="60">_Cut</Button>
            <Button Command="ApplicationCommands.Paste" CommandTarget="{Binding ElementName=txtEditor}" Width="60" Margin="3,0">_Paste</Button>
        </WrapPanel>
        <TextBox AcceptsReturn="True" Name="txtEditor" />
    </DockPanel>
</Window>
이 예시에서 코드에서의 것은 필요 없습니다. 우리가 단지 이런 특정한 컨트롤에서 특정한 커멘드들만 사용하길 원하기 때문에, WPF가 우리를 위해 모두 다뤄줄 것입니다. 일은 TextBox가 할 겁니다.
내가 이 커멘드들을 우리 Textbox 컨드롤에 연결하기 위해 어떻게 버튼에 CommandTarget 속성을 사용했는지 주목하세요. 이것은 WrapPanel이 Toolbar나 Menu 같은 데에서 같은 식으로 다루지 않지만, 커멘드들에게 목표를 주는 것이 매우 합리적이기에 이런 특정한 예시에서 필요합니다.
요약
커멘드를 다루는 것은 매우 간단명료하지만, 약간의 노력과 코드가 필요합니다. 그럼에도 그것에 대한 보상은 우리가 마지막 예시에서 확인했듯이, 당신이 같은 행동을 여러 곳에서 발동시키거나, WPF가 당신을 위해 완전히 다루는 이미 만들어진 커멘드들을 사용할 때 특히 확실할 것입니다.