This article is currently in the process of being translated into Korean (~80% done).
The ItemsControl
WPF는 데이터 목록을 표시하기위한 다양한 컨트롤을 제공합니다. 그 컨트롤들은 제공되는 기능의 복잡도 및 다양성에 따라 여러 모양과 형태를 가집니다. 가장 간단한 컨트롤은 단순한 마크 업 기반 루프 형태를 가지는 ItemsControl입니다. 사용자는 스타일과 탬플릿을 적용하면 됩니다. 대부분의 경우 이정도의 기능으로 충분합니다.
A simple ItemsControl example
먼저 아주 간단한 예를 들어보자. 여기서 우리는 항목 컨트롤에 일련의 항목을 수작업으로 공급한다. 이는 ItemControl이 얼마나 간단한지 보여 줄 것이다.
<Window x:Class="WpfTutorialSamples.ItemsControl.ItemsControlSample"
        xmlns="http://schemas.microsoft.com/winfx/2006/xaml/presentation"
        xmlns:x="http://schemas.microsoft.com/winfx/2006/xaml"
		xmlns:system="clr-namespace:System;assembly=mscorlib"
        Title="ItemsControlSample" Height="150" Width="200">
    <Grid Margin="10">
		<ItemsControl>
			<system:String>ItemsControl Item #1</system:String>
			<system:String>ItemsControl Item #2</system:String>
			<system:String>ItemsControl Item #3</system:String>
			<system:String>ItemsControl Item #4</system:String>
			<system:String>ItemsControl Item #5</system:String>
		</ItemsControl>
	</Grid>
</Window>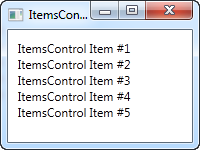
보시다시피, 우리가 항목을 수동으로 추가하는 대신 항목을 반복하기 위해 컨트롤을 사용하고 있다는 것을 보여주는 것은 아무것도 없다. 예를 들어, 5개의 TextBlock 컨트롤 - ItemControl은 기본적으로 전혀 보이지 않는다. 항목 중 하나를 클릭하면 선택한 항목의 개념이 없기 때문에 아무 일도 일어나지 않는다.
ItemsControl with data binding
물론 ItemsControl은 첫 번째 예에서와 같이 마크 업에 정의 된 항목과 함께 사용하기위한 것이 아닙니다. WPF의 다른 컨트롤과 마찬가지로 ItemsControl은 데이터 바인딩을 위해 만들어지며 템플릿을 사용하여 코드 숨김 클래스를 사용자에게 제공하는 방법을 정의합니다.
이를 증명하기 위해, 사용자에게 TODO 목록을 표시하는 예제를 하나 만들었고, 사용자가 자신의 템플릿을 정의하면 모든 것이 얼마나 유연한지 보여드리기 위해 ProgressBar 컨트롤을 사용하여 현재 완료 비율을 보여드렸었습니다. 먼저 몇 가지 코드와 스크린 샷 및 그 설명에 대한 설명이 있습니다.
<Window x:Class="WpfTutorialSamples.ItemsControl.ItemsControlDataBindingSample"
        xmlns="http://schemas.microsoft.com/winfx/2006/xaml/presentation"
        xmlns:x="http://schemas.microsoft.com/winfx/2006/xaml"
        Title="ItemsControlDataBindingSample" Height="150" Width="300">
    <Grid Margin="10">
		<ItemsControl Name="icTodoList">
			<ItemsControl.ItemTemplate>
				<DataTemplate>
					<Grid Margin="0,0,0,5">
						<Grid.ColumnDefinitions>
							<ColumnDefinition Width="*" />
							<ColumnDefinition Width="100" />
						</Grid.ColumnDefinitions>
						<TextBlock Text="{Binding Title}" />
						<ProgressBar Grid.Column="1" Minimum="0" Maximum="100" Value="{Binding Completion}" />
					</Grid>
				</DataTemplate>
			</ItemsControl.ItemTemplate>
		</ItemsControl>
	</Grid>
</Window>using System;
using System.Windows;
using System.Collections.Generic;
namespace WpfTutorialSamples.ItemsControl
{
public partial class ItemsControlDataBindingSample : Window
{
public ItemsControlDataBindingSample()
{
InitializeComponent();
List<TodoItem> items = new List<TodoItem>();
items.Add(new TodoItem() { Title = "Complete this WPF tutorial", Completion = 45 });
items.Add(new TodoItem() { Title = "Learn C#", Completion = 80 });
items.Add(new TodoItem() { Title = "Wash the car", Completion = 0 });
icTodoList.ItemsSource = items;
}
}
public class TodoItem
{
public string Title { get; set; }
public int Completion { get; set; }
}
}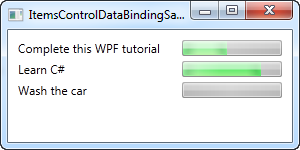
이 예제의 가장 중요한 부분은 ItemControl 내부의 DataTemplate 태그를 사용하여 ItemControl 내부에 지정하는 템플릿이다.ItemTemplate. Grid패널을 추가하여 다음과 같은 두 개의 열을 가져온다. 첫 번째에는 TODO 항목의 제목을 표시하는 TextBlock이 있고 두 번째 열에는 ProgressBar 컨트롤이 있으며이 값은 Completion 속성에 바인딩된다.
템플릿은 TodoItem을 나타내는데, Code-behind 파일에서 선언되며 여기서에서 여기에서 여러 인스턴스를 인스턴스화하고 목록에 추가한다. 결국이 목록은 ItemsControl의 ItemsSource 속성에 할당되며 나머지 작업을 수행합니다. 목록의 각 항목은 결과 스크린샷에서 볼 수 있듯이 템플릿을 사용하여 표시된다.
ItemsPanelTemplate 속성
위의 예에서 모든 항목은 위에서 아래로 렌더링되며, 각 항목은 전체 행을 차지한다. 이것은 ItemsControl이 기본적으로 모든 항목을 수직으로 정렬된 StackPanel에 사용하기 때문에 발생한다. 그러나 ItemsControl을 사용하면 모든 항목을 보유하는 데 사용되는 패널 유형을 변경할 수 있으므로 변경하기가 매우 쉽다. 예를 들면 다음과 같다.
<Window x:Class="WpfTutorialSamples.ItemsControl.ItemsControlPanelSample"
        xmlns="http://schemas.microsoft.com/winfx/2006/xaml/presentation"
        xmlns:x="http://schemas.microsoft.com/winfx/2006/xaml"
		xmlns:system="clr-namespace:System;assembly=mscorlib"
        Title="ItemsControlPanelSample" Height="150" Width="250">
	<Grid Margin="10">
		<ItemsControl>
			<ItemsControl.ItemsPanel>
				<ItemsPanelTemplate>
					<WrapPanel />
				</ItemsPanelTemplate>
			</ItemsControl.ItemsPanel>
			<ItemsControl.ItemTemplate>
				<DataTemplate>
					<Button Content="{Binding}" Margin="0,0,5,5" />
				</DataTemplate>
			</ItemsControl.ItemTemplate>
			<system:String>Item #1</system:String>
			<system:String>Item #2</system:String>
			<system:String>Item #3</system:String>
			<system:String>Item #4</system:String>
			<system:String>Item #5</system:String>
		</ItemsControl>
	</Grid>
</Window>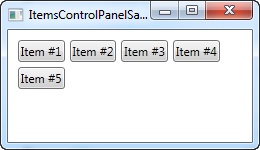
우리는 ItemControl이 ItemPanelTemplate 속성에서 WrapPanel을 선언함으로써 WrapPanel을 템플릿으로 사용해야 한다고 명시하고, 문자열을 단추로 렌더링하게 하는 ItemTemplate를 사용했다. 패널 중 하나를 사용할 수 있지만 일부는 다른 것보다 유용합니다.
다른 예로는 UniformGrid 패널이 있습니다. 이 태그는 열의 갯수를 정의할 수 있고, 각 열이 동일한 폭을 갖고 보여질 수 있도록 합니다.
<Window x:Class="WpfTutorialSamples.ItemsControl.ItemsControlPanelSample"
        xmlns="http://schemas.microsoft.com/winfx/2006/xaml/presentation"
        xmlns:x="http://schemas.microsoft.com/winfx/2006/xaml"
		xmlns:system="clr-namespace:System;assembly=mscorlib"
        Title="ItemsControlPanelSample" Height="150" Width="250">
	<Grid Margin="10">
		<ItemsControl>
			<ItemsControl.ItemsPanel>
				<ItemsPanelTemplate>
					<UniformGrid Columns="2" />
				</ItemsPanelTemplate>
			</ItemsControl.ItemsPanel>
			<ItemsControl.ItemTemplate>
				<DataTemplate>
					<Button Content="{Binding}" Margin="0,0,5,5" />
				</DataTemplate>
			</ItemsControl.ItemTemplate>
			<system:String>Item #1</system:String>
			<system:String>Item #2</system:String>
			<system:String>Item #3</system:String>
			<system:String>Item #4</system:String>
			<system:String>Item #5</system:String>
		</ItemsControl>
	</Grid>
</Window>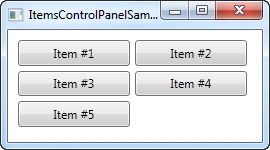
ItemsControl with scrollbars
ItemsControl이 실행되면, 매우 일반적인 문제를 직면할 수 있습니다. 기본적으로 ItemsControl은 어떠한 scrollbar를 갖지 않지 않기 때문에 만약 control의 내용이 화면에 맞지 않는다면 짤리게 됩니다. 이는 이글의 첫번째 예시에서 윈도우의 크기를 조정하면 나타날 수 있습니다.
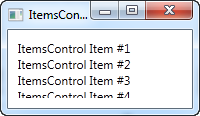
WPF makes this very easy to solve though. There are a number of possible solutions, for instance you can alter the template used by the ItemsControl to include a ScrollViewer control, but the easiest solution is to simply throw a ScrollViewer around the ItemsControl. Here's an example:
<Window x:Class="WpfTutorialSamples.ItemsControl.ItemsControlSample"
        xmlns="http://schemas.microsoft.com/winfx/2006/xaml/presentation"
        xmlns:x="http://schemas.microsoft.com/winfx/2006/xaml"
		xmlns:system="clr-namespace:System;assembly=mscorlib"
        Title="ItemsControlSample" Height="150" Width="200">
	<Grid Margin="10">
		<ScrollViewer VerticalScrollBarVisibility="Auto" HorizontalScrollBarVisibility="Auto">
			<ItemsControl>
				<system:String>ItemsControl Item #1</system:String>
				<system:String>ItemsControl Item #2</system:String>
				<system:String>ItemsControl Item #3</system:String>
				<system:String>ItemsControl Item #4</system:String>
				<system:String>ItemsControl Item #5</system:String>
			</ItemsControl>
		</ScrollViewer>
	</Grid>
</Window>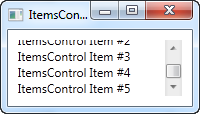
Scrollbar 의 visibility 속성을 양쪽으로 Auto로 하면 필요시 보일 수 있도록 하였습니다. 스크린샷에서 보일 수 있듯이 모든 items을 스크롤로 볼 수 있습니다.
Summary
ItemsControl은 item을 선택할 필요가 없이 데이터를 보여주기 위한 상황에서 좋은 컨트롤입니다. 만약에 item 선택 기능이 필요한 경우에는 ListBox 또는 ListView를 사용하는 것이 좋습니다. 이것들은 다음 챕터에서 설명할 것 입니다.