This article is currently in the process of being translated into Korean (~55% done).
Playing audio
WPF는 오디오 와 비디오 플레이를 자체 내장하고 있으며, 이것은 다음 몇장의 강좌에서 보게 될것이며, 이번 강좌에서 실제 오디오 파일[예) MP3파일)에서 오디오를 플레이 하는 부분을 논의 할것 이다. 그러나, 첫째 이것은 매우 간단하다.
System sounds and the SoundPlayer
WPF는 SoundPlayer라고 불리는 것을 가지고 있다. 이것은 당신을 위해 WAV 포맷을 기본으로 하는 오디오 파일을 재생 할것 이다. WAV는 요즘 매우 널리 사용되는 포맷이 아니며, 주요 이유는 압축되지 않아서, 매우 큰 공간을 차제하게 된다.
그래서 사운드플레이어 클래스를 간단하게 사용하는 동안, 이것은 사용할만 하다. 우리는 MediaPlayer 와 MediaElement 클래스에 초점을 맞출것이다. 이것은 MP3파일을 재생할 수 있다, 그러나 첫째, 당신의 WPF 프로그램에서 간단하게 소리를 재생하는 간단한 방법을 볼것이다. - SystemSounds class 이다.
SystemSounds 클래스는 몇개의 다른 소리를 제공한다. 이것은 당신의 윈도우 시스템에서 소리를 정의하며 교신하다. 이것은 감탄스럽다, 당신은 한줄의 코드로 사운드를 세팅하며 재생할 수 있다.
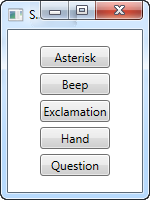
SystemSounds.Beep.Play();여기에 완벽한 예제가 있다. 우리는 지금 모든 가능한 사운드를 사용할 수 있다.
<Window x:Class="WpfTutorialSamples.Audio_and_Video.SystemSoundsSample"
        xmlns="http://schemas.microsoft.com/winfx/2006/xaml/presentation"
        xmlns:x="http://schemas.microsoft.com/winfx/2006/xaml"
        Title="SystemSoundsSample" Height="200" Width="150">
    <StackPanel Margin="10" HorizontalAlignment="Center" VerticalAlignment="Center">
        <Button Name="btnAsterisk" Click="btnAsterisk_Click">Asterisk</Button>
        <Button Name="btnBeep" Margin="0,5" Click="btnBeep_Click">Beep</Button>
        <Button Name="btnExclamation" Click="btnExclamation_Click">Exclamation</Button>
        <Button Name="btnHand" Margin="0,5" Click="btnHand_Click">Hand</Button>
        <Button Name="btnQuestion" Click="btnQuestion_Click">Question</Button>
    </StackPanel>
</Window>using System;
using System.Media;
using System.Windows;
namespace WpfTutorialSamples.Audio_and_Video
{
public partial class SystemSoundsSample : Window
{
public SystemSoundsSample()
{
InitializeComponent();
}
private void btnAsterisk_Click(object sender, RoutedEventArgs e)
{
SystemSounds.Asterisk.Play();
}
private void btnBeep_Click(object sender, RoutedEventArgs e)
{
SystemSounds.Beep.Play();
}
private void btnExclamation_Click(object sender, RoutedEventArgs e)
{
SystemSounds.Exclamation.Play();
}
private void btnHand_Click(object sender, RoutedEventArgs e)
{
SystemSounds.Hand.Play();
}
private void btnQuestion_Click(object sender, RoutedEventArgs e)
{
SystemSounds.Question.Play();
}
}
}
이것을 사용하기에는 몇가지 제한 사항이 있다. 첫번째, 당신은 단지 다섯가지 소리에만 접근할 수 있다. 두번째, 윈도우에서 이기능이 비활성화 된경우, 소리는 무음으로 바뀔것입니다. 다른경우, 만약 당신이 소리를 사용하길 원할 경우, 윈도우는 경고, 질문 같은 소리를 만들것입니다. 이것은 당신 프로그램에서 당신의 무음 선택을 존중할 것입니다.
미디어 플레이어 클래스
미디어 플레이어 클래스는 윈도우 미디어 기술을 사용해서 오디오와 몇가지 최신 형식의 비디오를 재생합니다. 예) MP3, MPEG 이번 강좌에서, 우리는 이것을 사용해서 오디오를 재생할것 이며, 다음 강좌에서 비디오에 초첨을 맞출 것입니다.
미디어플레이어 클래스를 사용해서 MP3 파일을 재생하는것은 매우 간단하다, 우리는 다음 예제에서 볼것 이다.
<Window x:Class="WpfTutorialSamples.Audio_and_Video.MediaPlayerAudioSample"
        xmlns="http://schemas.microsoft.com/winfx/2006/xaml/presentation"
        xmlns:x="http://schemas.microsoft.com/winfx/2006/xaml"
        Title="MediaPlayerAudioSample" Height="100" Width="200">
    <Grid VerticalAlignment="Center" HorizontalAlignment="Center">
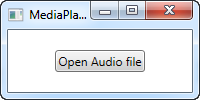
        <Button Name="btnOpenAudioFile" Click="btnOpenAudioFile_Click">Open Audio file</Button>
    </Grid>
</Window>using System;
using System.Windows;
using System.Windows.Media;
using Microsoft.Win32;
namespace WpfTutorialSamples.Audio_and_Video
{
public partial class MediaPlayerAudioSample : Window
{
private MediaPlayer mediaPlayer = new MediaPlayer();
public MediaPlayerAudioSample()
{
InitializeComponent();
}
private void btnOpenAudioFile_Click(object sender, RoutedEventArgs e)
{
OpenFileDialog openFileDialog = new OpenFileDialog();
openFileDialog.Filter = "MP3 files (*.mp3)|*.mp3|All files (*.*)|*.*";
if(openFileDialog.ShowDialog() == true)
{
mediaPlayer.Open(new Uri(openFileDialog.FileName));
mediaPlayer.Play();
}
}
}
}
이번 예제는, 우리는 단지 하나의 버튼을 가지고 있다. 이것은 파일열기상자를 보여 줄것이며, 이것은 당신에게 MP3 파일을 선택하게 할것이며, 완료 되었을 때, 이것은 미디어플레이어를 생성 할것이며, 선택한 파일을 열고 재생할것이다. 주의할점은 미디오플레이어 객체는 이벤트핸들러 밖에서 생성되었다. 이벤트 핸들러가 완료되면 오브젝트가 범위를 벗어나므로 조기에 가비지 콜렉션되지 않으므로 재생이 중지됩니다.
Please also notice that no exception handling is done for this example, as usual to keep the example as compact as possible, but in this case also because the Open() and Play() methods actually doesn't throw any exceptions. Instead, you can use the MediaOpened and MediaFailed events to act when things go right or wrong.
미디어플레이어 조정
여기에 우리의 첫번째 미디어플레이어 예제가 있다. 우리는 단지 파일을 열면, 자동으로 파일 재생이 시작되며, 사용자에게 이것을 조정을 할 기회를 주지 않는다. 그러나 진행 되는동안, 명백하게 미디어플레이어를 조정할 수 있을 것이다. 여기의 예제에서 당신에게 중요한 함수를 보여 줄것 이다.
<Window x:Class="WpfTutorialSamples.Audio_and_Video.MediaPlayerAudioControlSample"
        xmlns="http://schemas.microsoft.com/winfx/2006/xaml/presentation"
        xmlns:x="http://schemas.microsoft.com/winfx/2006/xaml"
        Title="MediaPlayerAudioControlSample" Height="120" Width="300">
    <StackPanel Margin="10">
        <Label Name="lblStatus" Content="Not playing..." HorizontalContentAlignment="Center" Margin="5" />
        <WrapPanel HorizontalAlignment="Center">
            <Button Name="btnPlay" Click="btnPlay_Click">Play</Button>
            <Button Name="btnPause" Margin="5,0" Click="btnPause_Click">Pause</Button>
            <Button Name="btnStop" Click="btnStop_Click">Stop</Button>
        </WrapPanel>
    </StackPanel>
</Window>using System;
using System.Windows;
using System.Windows.Media;
using System.Windows.Threading;
using Microsoft.Win32;
namespace WpfTutorialSamples.Audio_and_Video
{
public partial class MediaPlayerAudioControlSample : Window
{
private MediaPlayer mediaPlayer = new MediaPlayer();
public MediaPlayerAudioControlSample()
{
InitializeComponent();
OpenFileDialog openFileDialog = new OpenFileDialog();
openFileDialog.Filter = "MP3 files (*.mp3)|*.mp3|All files (*.*)|*.*";
if(openFileDialog.ShowDialog() == true)
mediaPlayer.Open(new Uri(openFileDialog.FileName));
DispatcherTimer timer = new DispatcherTimer();
timer.Interval = TimeSpan.FromSeconds(1);
timer.Tick += timer_Tick;
timer.Start();
}
void timer_Tick(object sender, EventArgs e)
{
if(mediaPlayer.Source != null)
lblStatus.Content = String.Format("{0} / {1}", mediaPlayer.Position.ToString(@"mm\:ss"), mediaPlayer.NaturalDuration.TimeSpan.ToString(@"mm\:ss"));
else
lblStatus.Content = "No file selected...";
}
private void btnPlay_Click(object sender, RoutedEventArgs e)
{
mediaPlayer.Play();
}
private void btnPause_Click(object sender, RoutedEventArgs e)
{
mediaPlayer.Pause();
}
private void btnStop_Click(object sender, RoutedEventArgs e)
{
mediaPlayer.Stop();
}
}
}
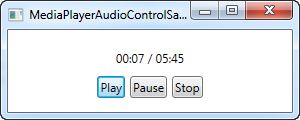
In this example, we have expanded our player a bit, so that it now contains a Play, Pause and Stop button, as well as a label for showing the current playback status. The MP3 file to be played is loaded the same way, but we do it as soon as the application starts, to keep the example simple.
Right after the MP3 is loaded, we start a timer, which ticks every second. We use this event to update the status label, which will show the current progress as well as the entire length of the loaded file.
The three buttons each simply call a corresponding method on the MediaPlayer object - Play, Pause and Stop.
Summary
There are several more options that you can let your user control, but I want to save that for when we have talked about the video aspects of the MediaPlayer class - at that point, I'll do a more complete example of a media player capable of playing both audio and video files, with more options.