The community is working on translating this tutorial into Galician, but it seems that no one has started the translation process for this article yet. If you can help us, then please click "More info".
In this article series, we're building a complete Snake game from scratch. It makes sense to start with the Introduction and then work your way through the articles one by one, to get the full understanding.
If you want to get the complete source code for the game at once, to get started modifying and learning from it right now, consider downloading all our samples!
Adding food for the Snake
At this stage of the SnakeWPF article series, we now have a checkerboard background as the game area, as well as a lovely looking green snake moving around it. However, as mentioned in the introduction, the purpose of the game is for the snake to eat some food - in our version it will be red apples!
So now it's time to start adding some food to the game area. We'll do it by randomly adding a red circle somewhere within the boundaries of the GameArea Canvas, but we need to make sure that we are not placing it in one of the squares already occupied by the constantly growing snake. In other words, one of the most important aspects of placing an apple on the game area is the code that decides the next position. Here's the code we'll use for doing just that:
private Point GetNextFoodPosition()
{
    int maxX = (int)(GameArea.ActualWidth / SnakeSquareSize);
    int maxY = (int)(GameArea.ActualHeight / SnakeSquareSize);
    int foodX = rnd.Next(0, maxX) * SnakeSquareSize;
    int foodY = rnd.Next(0, maxY) * SnakeSquareSize;

    foreach(SnakePart snakePart in snakeParts)
    {
    if((snakePart.Position.X == foodX) && (snakePart.Position.Y == foodY))
        return GetNextFoodPosition();
    }

    return new Point(foodX, foodY);
}
Be sure to also add this line in the top of the Window class declaration, along with the rest of the fields/constants:
public partial class SnakeWPFSample : Window
{
    private Random rnd = new Random();
    ......
So, to quickly explain the code: We once again use the SnakeSquareSize constant to help us calculate the next position for our food, in combination with the Random class, which will give us a random X and Y position. Once we have it, we run through all the current snake parts and check if their position matches the X and Y coordinates we just created - if they do, it means that we have hit an area currently occupied by the snake and then we ask for a new position by simply calling the method again (making this a recursive method).
This also means that this method can call itself an unlimited amount of times and, in theory, result in an endless loop. We could do some checking for that, but it shouldn't be necessary, since it would require that the snake was so long that no empty space was left - my bet is that the game will have ended before this happens.
With that in place, we're ready to add the code which will add the food at the newly calculated position - we'll be doing it from a method called DrawSnakeFood(). Thanks to all the work already handled by GetNextFoodPosition(), it's pretty simple, but first, be sure to declare the field used to save a reference to the food, as well as the SolidColorBrush used to draw the apple, along with the other field/constant declarations:
public partial class SnakeWPFSample : Window
{
    private UIElement snakeFood = null;
    private SolidColorBrush foodBrush = Brushes.Red;
    ......
Here's the implementation of the method:
private void DrawSnakeFood()
{
    Point foodPosition = GetNextFoodPosition();
    snakeFood = new Ellipse()
    {
    Width = SnakeSquareSize,
    Height = SnakeSquareSize,
    Fill = foodBrush
    };
    GameArea.Children.Add(snakeFood);
    Canvas.SetTop(snakeFood, foodPosition.Y);
    Canvas.SetLeft(snakeFood, foodPosition.X);
}
As promised, it's very simple - as soon as we have the position, we simply create a new Ellipse instance and once again we use the SnakeSquareSize constant to make sure that it has the same size as the background tiles as well as each snake part. We save a reference to the Ellipse instance in the snakeFood field, because we need it later on.
With that in place, we really just need to call the DrawSnakeFood() method to see the result of our work. This will be done in two situations: At the beginning of the game and when the snake "eats" the food (more on that later). For now, let's add a call to it in our StartNewGame() method:
private void StartNewGame()
{
    snakeLength = SnakeStartLength;
    snakeDirection = SnakeDirection.Right;
    snakeParts.Add(new SnakePart() { Position = new Point(SnakeSquareSize * 5, SnakeSquareSize * 5) });
    gameTickTimer.Interval = TimeSpan.FromMilliseconds(SnakeStartSpeed);

    // Draw the snake and the snake food
    DrawSnake();
    DrawSnakeFood();

    // Go!
    gameTickTimer.IsEnabled = true;
}
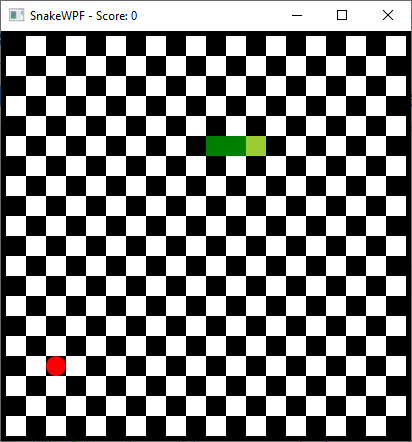
That's it! If you run the game now, you should see that the snake finally has some food to chase:

Quite a bit of work to place a red dot on the screen, right?
Summary
In this article, we have finally added some food to the table for the snake to catch, but there's still work to be done: We need to be able to control the snake, and we need to know when it hits something (a wall, its own tail or the food). More on that in the next article.