The community is working on translating this tutorial into Galician, but it seems that no one has started the translation process for this article yet. If you can help us, then please click "More info".
The MessageBox
WPF offers several dialogs for your application to utilize, but the simplest one is definitely the MessageBox. Its sole purpose is to show a message to the user, and then offer one or several ways for the user to respond to the message.
The MessageBox is used by calling the static Show() method, which can take a range of different parameters, to be able to look and behave the way you want it to. We'll be going through all the various forms in this article, with each variation represented by the MessageBox.Show() line and a screenshot of the result. In the end of the article, you can find a complete example which lets you test all the variations.
In its simplest form, the MessageBox just takes a single parameter, which is the message to be displayed:
MessageBox.Show("Hello, world!");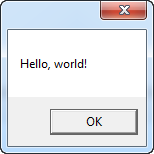
MessageBox with a title
The above example might be a bit too bare minimum - a title on the window displaying the message would probably help. Fortunately, the second and optional parameter allows us to specify the title:
MessageBox.Show("Hello, world!", "My App");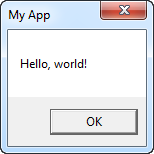
MessageBox with extra buttons
By default, the MessageBox only has the one Ok button, but this can be changed, in case you want to ask your user a question and not just show a piece of information. Also notice how I use multiple lines in this message, by using a line break character (\n):
MessageBox.Show("This MessageBox has extra options.\n\nHello, world?", "My App", MessageBoxButton.YesNoCancel);You control which buttons are displayed by using a value from the MessageBoxButton enumeration - in this case, a Yes, No and Cancel button is included. The following values, which should be self-explanatory, can be used:
- OK
- OKCancel
- YesNoCancel
- YesNo
Now with multiple choices, you need a way to be able to see what the user chose, and fortunately, the MessageBox.Show() method always returns a value from the MessageBoxResult enumeration that you can use. Here's an example:
MessageBoxResult result = MessageBox.Show("Would you like to greet the world with a \"Hello, world\"?", "My App", MessageBoxButton.YesNoCancel);
switch(result)
{
	case MessageBoxResult.Yes:
		MessageBox.Show("Hello to you too!", "My App");
		break;
	case MessageBoxResult.No:
		MessageBox.Show("Oh well, too bad!", "My App");
		break;
	case MessageBoxResult.Cancel:
		MessageBox.Show("Nevermind then...", "My App");
		break;
}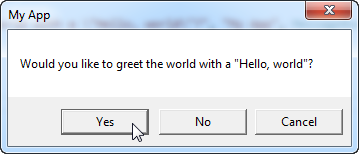
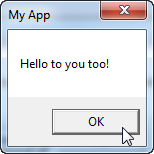
By checking the result value of the MessageBox.Show() method, you can now react to the user choice, as seen in the code example as well as on the screenshots.
MessageBox with an icon
The MessageBox has the ability to show a pre-defined icon to the left of the text message, by using a fourth parameter:
MessageBox.Show("Hello, world!", "My App", MessageBoxButton.OK, MessageBoxImage.Information);Using the MessageBoxImage enumeration, you can choose between a range of icons for different situations. Here's the complete list:
- Asterisk
- Error
- Exclamation
- Hand
- Information
- None
- Question
- Stop
- Warning
The names should say a lot about how they look, but feel free to experiment with the various values or have a look at this MSDN article, where each value is explained and even illustrated: http://msdn.microsoft.com/en-us/library/system.windows.messageboximage.aspx
MessageBox with a default option
The MessageBox will select a button as the default choice, which is then the button invoked in case the user just presses Enter once the dialog is shown. For instance, if you display a MessageBox with a "Yes" and a "No" button, "Yes" will be the default answer. You can change this behavior using a fifth parameter to the MessageBox.Show() method though:
MessageBox.Show("Hello, world?", "My App", MessageBoxButton.YesNo, MessageBoxImage.Question, MessageBoxResult.No);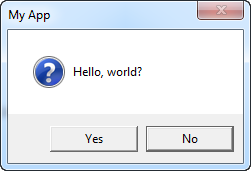
Notice on the screenshot how the "No" button is slightly elevated, to visually indicate that it is selected and will be invoked if the Enter or Space button is pressed.
The complete example
As promised, here's the complete example used in this article:
<Window x:Class="WpfTutorialSamples.Dialogs.MessageBoxSample"
        xmlns="http://schemas.microsoft.com/winfx/2006/xaml/presentation"
        xmlns:x="http://schemas.microsoft.com/winfx/2006/xaml"
        Title="MessageBoxSample" Height="250" Width="300">
    <StackPanel HorizontalAlignment="Center" VerticalAlignment="Center">
        <StackPanel.Resources>
            <Style TargetType="Button">
                <Setter Property="Margin" Value="0,0,0,10" />
            </Style>
        </StackPanel.Resources>
        <Button Name="btnSimpleMessageBox" Click="btnSimpleMessageBox_Click">Simple MessageBox</Button>
        <Button Name="btnMessageBoxWithTitle" Click="btnMessageBoxWithTitle_Click">MessageBox with title</Button>
        <Button Name="btnMessageBoxWithButtons" Click="btnMessageBoxWithButtons_Click">MessageBox with buttons</Button>
        <Button Name="btnMessageBoxWithResponse" Click="btnMessageBoxWithResponse_Click">MessageBox with response</Button>
        <Button Name="btnMessageBoxWithIcon" Click="btnMessageBoxWithIcon_Click">MessageBox with icon</Button>
        <Button Name="btnMessageBoxWithDefaultChoice" Click="btnMessageBoxWithDefaultChoice_Click">MessageBox with default choice</Button>
    </StackPanel>
</Window>
using System;
using System.Windows;
namespace WpfTutorialSamples.Dialogs
{
public partial class MessageBoxSample : Window
{
public MessageBoxSample()
{
InitializeComponent();
}
private void btnSimpleMessageBox_Click(object sender, RoutedEventArgs e)
{
MessageBox.Show("Hello, world!");
}
private void btnMessageBoxWithTitle_Click(object sender, RoutedEventArgs e)
{
MessageBox.Show("Hello, world!", "My App");
}
private void btnMessageBoxWithButtons_Click(object sender, RoutedEventArgs e)
{
MessageBox.Show("This MessageBox has extra options.\n\nHello, world?", "My App", MessageBoxButton.YesNoCancel);
}
private void btnMessageBoxWithResponse_Click(object sender, RoutedEventArgs e)
{
MessageBoxResult result = MessageBox.Show("Would you like to greet the world with a \"Hello, world\"?", "My App", MessageBoxButton.YesNoCancel);
switch(result)
{
case MessageBoxResult.Yes:
MessageBox.Show("Hello to you too!", "My App");
break;
case MessageBoxResult.No:
MessageBox.Show("Oh well, too bad!", "My App");
break;
case MessageBoxResult.Cancel:
MessageBox.Show("Nevermind then...", "My App");
break;
}
}
private void btnMessageBoxWithIcon_Click(object sender, RoutedEventArgs e)
{
MessageBox.Show("Hello, world!", "My App", MessageBoxButton.OK, MessageBoxImage.Information);
}
private void btnMessageBoxWithDefaultChoice_Click(object sender, RoutedEventArgs e)
{
MessageBox.Show("Hello, world?", "My App", MessageBoxButton.YesNo, MessageBoxImage.Question, MessageBoxResult.No);
}
}
}