The community is working on translating this tutorial into Galician, but it seems that no one has started the translation process for this article yet. If you can help us, then please click "More info".
In this article series, we're building a complete Snake game from scratch. It makes sense to start with the Introduction and then work your way through the articles one by one, to get the full understanding.
If you want to get the complete source code for the game at once, to get started modifying and learning from it right now, consider downloading all our samples!
Improving SnakeWPF: Adding a high score list
In the previous article, we made a lot of visual improvements to our SnakeWPF implementation. In this article, I would like to add a very cool feature: A high score list! On top of that, I would like to make the game a bit more user-friendly, by adding a welcome screen. I'll also be replacing the very non-gamey "You died"-messagebox with an in-game screen.
We need quite a bit of extra code and markup for this, but let's start with the easy part - the XAML!
XAML
The first thing I would like to do, is to add a bunch of XAML to the Snake window. This will mainly consists of 4 new containers (in this case Border controls), which will host a range of child controls to support various situations:
- One container for displaying a welcome message when the game starts, informing about the controls to be used etc.
- One container for displaying the high score list
- One container to display when the user has beaten one of the high scores, including a TextBox for entering a name
- One container to display when the user dies, but hasn't made it into the high score list (replacing the boring MessageBox we previously used)
We will add these containers to the GameArea Canvas and then simply hide them when we don't need them. As mentioned, each container will serve a different purpose and include quite a bit of markup, but we only use WPF controls which have already been discussed in this tutorial.
Welcome message
Add this piece of XAML inside the GameArea Canvas control:
<Border BorderBrush="Silver" BorderThickness="2" Width="300" Height="300" Canvas.Left="50" Canvas.Top="50" Name="bdrWelcomeMessage" Panel.ZIndex="1">
    <StackPanel Orientation="Vertical" Background="AliceBlue">
    <TextBlock FontWeight="Bold" FontSize="50" HorizontalAlignment="Center" Margin="0,20,0,0">SnakeWPF</TextBlock>
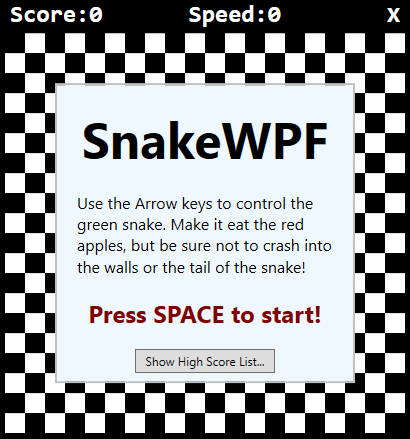
    <TextBlock TextWrapping="Wrap" Margin="20" FontSize="16">Use the Arrow keys to control the green snake. Make it eat the red apples, but be sure not to crash into the walls or the tail of the snake!</TextBlock>
    <TextBlock FontWeight="Bold" HorizontalAlignment="Center" FontSize="24" Foreground="Maroon">Press SPACE to start!</TextBlock>
    <Button Margin="20" Name="btnShowHighscoreList" Click="BtnShowHighscoreList_Click" HorizontalAlignment="Center" Padding="10,3">Show High Score List...</Button>
    </StackPanel>
</Border>
It briefly tells the user what the game is all about, how the Snake is controlled and how to start the game. The Border, which holds all the content, is initially visible, so this will be the first thing the user meets when the game starts. In the bottom of the screen, I've added a Button for displaying the high score list (which we'll add in just a minute). The Click event handler will be implemented in the Code-behind later.
High score list
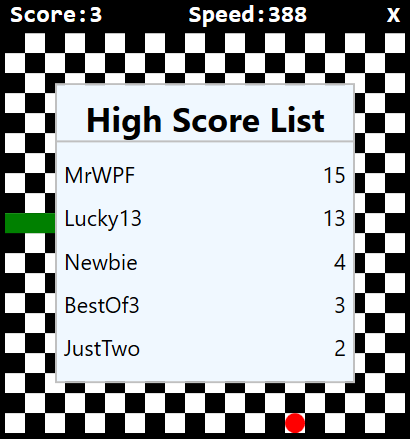
Now it gets a bit more complex, because I want to do this the WPF-way and use data-binding to display the high score list instead of e.g. manually building and updating the list. But don't worry, I'll explain it all as we move along. First, add this piece of XAML inside the GameArea Canvas, just like we did before - the Canvas will, as mentioned, hold all our Border controls, each of them offering their own piece of functionality for our game:
<Border BorderBrush="Silver" BorderThickness="2" Width="300" Height="300" Canvas.Left="50" Canvas.Top="50" Name="bdrHighscoreList" Panel.ZIndex="1" Visibility="Collapsed">
    <StackPanel Orientation="Vertical" Background="AliceBlue">
    <Border BorderThickness="0,0,0,2" BorderBrush="Silver" Margin="0,10">
        <TextBlock HorizontalAlignment="Center" FontSize="34" FontWeight="Bold">High Score List</TextBlock>
    </Border>
    <ItemsControl ItemsSource="{Binding Source={StaticResource HighScoreListViewSource}}">
        <ItemsControl.ItemTemplate>
        <DataTemplate>
            <DockPanel Margin="7">
            <TextBlock Text="{Binding PlayerName}" DockPanel.Dock="Left" FontSize="22"></TextBlock>
            <TextBlock Text="{Binding Score}" DockPanel.Dock="Right" FontSize="22" HorizontalAlignment="Right"></TextBlock>
            </DockPanel>
        </DataTemplate>
        </ItemsControl.ItemTemplate>
    </ItemsControl>
    </StackPanel>
</Border>
Notice how this Border is initially not displayed (Visibility = Collapsed). We use an ItemsControl (we talked about this previously in this tutorial), with a custom ItemsSource called HighScoreListViewSource. We will be using a CollectionViewSource to make sure that the collection we bind to is always sorted properly. We need to define this resource in the Window XAML, so as a child to the Window tag, you should add this piece of markup, making your Window declaration look like this:
<Window x:Class="WpfTutorialSamples.Games.SnakeWPFSample"
    xmlns="http://schemas.microsoft.com/winfx/2006/xaml/presentation"
    xmlns:x="http://schemas.microsoft.com/winfx/2006/xaml"
    xmlns:d="http://schemas.microsoft.com/expression/blend/2008"
    xmlns:mc="http://schemas.openxmlformats.org/markup-compatibility/2006"
    xmlns:local="clr-namespace:WpfTutorialSamples.Games"
    mc:Ignorable="d"
    x:Name="window"
    xmlns:scm="clr-namespace:System.ComponentModel;assembly=WindowsBase"
    Title="SnakeWPF - Score: 0" SizeToContent="WidthAndHeight" ContentRendered="Window_ContentRendered" KeyUp="Window_KeyUp"
    ResizeMode="NoResize" WindowStyle="None" Background="Black" MouseDown="Window_MouseDown">

    <Window.Resources>
    <CollectionViewSource Source="{Binding ElementName=window, Path=HighscoreList}" x:Key="HighScoreListViewSource">
        <CollectionViewSource.SortDescriptions>
        <scm:SortDescription Direction="Descending" PropertyName="Score" />
        </CollectionViewSource.SortDescriptions>
    </CollectionViewSource>
    </Window.Resources>
    ................
Notice that I sneaked in a new reference: The xmlns:scm, used to access the SortDescription type. I also added the x:Name property and set it to window, so that we can reference members defined on the MainWindow class in Code-behind.
In the Window.Resources, I have added a new CollectionViewSource. It uses binding to attach to a property called HighscoreList, which we will define in Code-behind. Notice also that I add a SortDescription to it, specifying that the list should be sorted descendent by a property called Score, basically meaning that the highest score will be displayed first and so on.
In Code-behind, we need to define the property called HighscoreList, which the ItemsSource relies on, but we'll get to that after we're done adding the last XAML.
New high score
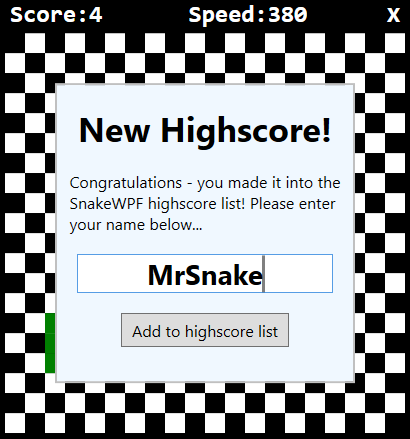
When the user beats an existing high score, we will display a nicely looking message about it. The XAML looks like this, and once again, it should be added inside the GameArea Canvas:
<Border BorderBrush="Silver" BorderThickness="2" Width="300" Height="300" Canvas.Left="50" Canvas.Top="50" Name="bdrNewHighscore" Panel.ZIndex="1" Visibility="Collapsed">
    <StackPanel Orientation="Vertical" Background="AliceBlue">
    <TextBlock HorizontalAlignment="Center" FontSize="34" FontWeight="Bold" Margin="20">New Highscore!</TextBlock>
    <TextBlock HorizontalAlignment="Center" TextWrapping="Wrap" FontSize="16">
        Congratulations - you made it into the SnakeWPF highscore list! Please enter your name below...
    </TextBlock>
    <TextBox Name="txtPlayerName" FontSize="28" FontWeight="Bold" MaxLength="8" Margin="20" HorizontalContentAlignment="Center"></TextBox>
    <Button Name="btnAddToHighscoreList" FontSize="16" HorizontalAlignment="Center" Click="BtnAddToHighscoreList_Click" Padding="10,5">Add to highscore list</Button>
    </StackPanel>
</Border>
All very simple with some text, a TextBox for entering the name and a Button to click to add to the list - we'll define the BtnAddToHighscoreList_Click event handler later.
"Oh no - you died!"
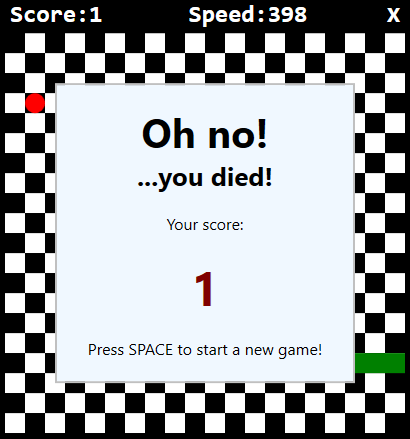
The last part is the "Oh no, you died and you didn't make it into the high score list" screen, which we'll use to replace the boring MessageBox which did the same thing previously. The XAML looks like this:
<Border BorderBrush="Silver" BorderThickness="2" Width="300" Height="300" Canvas.Left="50" Canvas.Top="50" Name="bdrEndOfGame" Panel.ZIndex="1" Visibility="Collapsed">
    <StackPanel Orientation="Vertical" Background="AliceBlue">
    <TextBlock HorizontalAlignment="Center" FontSize="40" FontWeight="Bold" Margin="0,20,0,0">Oh no!</TextBlock>
    <TextBlock HorizontalAlignment="Center" FontSize="26" FontWeight="Bold">...you died!</TextBlock>
    <TextBlock Margin="20" TextAlignment="Center" FontSize="16">Your score: </TextBlock>
    <TextBlock Name="tbFinalScore" TextAlignment="Center" FontSize="48" FontWeight="Bold" Foreground="Maroon">0</TextBlock>
    <TextBlock TextAlignment="Center" FontSize="16" Margin="20">Press SPACE to start a new game!</TextBlock>
    </StackPanel>
</Border>
It informs the user about the unfortunate turn of events, displays the final score and tells the user how to start a new game - pretty simple!
Code-behind
With all the XAML in place, we're finally ready to implement the Code-behind stuff! First, we need to implement the event handlers we defined in the XAML. Here's the one for the "Show high score list" button:
private void BtnShowHighscoreList_Click(object sender, RoutedEventArgs e)
{
    bdrWelcomeMessage.Visibility = Visibility.Collapsed;
    bdrHighscoreList.Visibility = Visibility.Visible;
}
Quite simple, as you can see - when the button is clicked, we hide the welcome message and then we display the high score list - we'll add that now.
Implementing the high score list
The other event handler we have relates to adding a new entry to the high score list, but for that, we need a couple of other additions - first of all, the actual property for holding the high score entries:
public ObservableCollection<SnakeHighscore> HighscoreList
{
    get; set;
} = new ObservableCollection<SnakeHighscore>();
As you can see, this is an ObservableCollection, holding the type SnakeHighscore. First, be sure to include the namespace holding the ObservableCollection type:
using System.Collections.ObjectModel;Then implement the SnakeHighscore class:
public class SnakeHighscore
{
    public string PlayerName { get; set; }

    public int Score { get; set; }
}
Quite a simple class, as you can see - it just serves as a container for the name and score of the player who made it into the high score list.
Loading/saving the high score list
We also need some code to load and save the list - the Save method will be called when a new entry is added to the list, while the Load method is called when our game starts. I'll be using a simple XML file to hold the list, which will allow us to use the built-in XmlSerializer class to automatically load and save the list.
There are MANY ways of loading/saving data, and several other relevant formats like JSON or even a plain text file, but I wanted to keep this part in as few lines of code as possible, since it's not that relevant for a WPF tutorial. Also, the XmlSerializer approach makes the code pretty flexible - you can easily add new properties to the SnakeHighscore class and they will be automatically persisted. Here's the LoadHighscoreList() method:
private void LoadHighscoreList()
{
    if(File.Exists("snake_highscorelist.xml"))
    {
    XmlSerializer serializer = new XmlSerializer(typeof(List<SnakeHighscore>));
    using(Stream reader = new FileStream("snake_highscorelist.xml", FileMode.Open))
    {
        List<SnakeHighscore> tempList = (List<SnakeHighscore>)serializer.Deserialize(reader);
        this.HighscoreList.Clear();
        foreach(var item in tempList.OrderByDescending(x => x.Score))
        this.HighscoreList.Add(item);
    }
    }
}
You need to include a couple of additional namespaces for this:
using System.IO;
using System.Xml.Serialization;
Be sure to call the LoadHighscoreList() method, e.g. in the constructor of the Window:
public SnakeWPFSample()
{
    InitializeComponent();
    gameTickTimer.Tick += GameTickTimer_Tick;
    LoadHighscoreList();
}
Next, we implement the SaveHighscoreList() method:
private void SaveHighscoreList()
{
    XmlSerializer serializer = new XmlSerializer(typeof(ObservableCollection<SnakeHighscore>));
    using(Stream writer = new FileStream("snake_highscorelist.xml", FileMode.Create))
    {
    serializer.Serialize(writer, this.HighscoreList);
    }
}
The Save method is most relevant to call when we add a new entry - this happens in the BtnAddToHighscoreList_Click() event handler, which should look like this:
private void BtnAddToHighscoreList_Click(object sender, RoutedEventArgs e)
{
    int newIndex = 0;
    // Where should the new entry be inserted?
    if((this.HighscoreList.Count > 0) && (currentScore < this.HighscoreList.Max(x => x.Score)))
    {
    SnakeHighscore justAbove = this.HighscoreList.OrderByDescending(x => x.Score).First(x => x.Score >= currentScore);
    if(justAbove != null)
        newIndex = this.HighscoreList.IndexOf(justAbove) + 1;
    }
    // Create & insert the new entry
    this.HighscoreList.Insert(newIndex, new SnakeHighscore()
    {
    PlayerName = txtPlayerName.Text,
    Score = currentScore
    });
    // Make sure that the amount of entries does not exceed the maximum
    while(this.HighscoreList.Count > MaxHighscoreListEntryCount)
    this.HighscoreList.RemoveAt(MaxHighscoreListEntryCount);

    SaveHighscoreList();

    bdrNewHighscore.Visibility = Visibility.Collapsed;
    bdrHighscoreList.Visibility = Visibility.Visible;
}
It's quite simple: We try to decide if the new entry should be added at the top of the list (a new best!) or if it belongs further down the list. Once we have the new index, we insert a new instance of the SnakeHighscore class, using the current score and the name entered by the player. We then remove any unwanted entries from the bottom of the list, if the list suddenly has more items than we want (MaxHighscoreListEntryCount). Then we save the list (SaveHighscoreList()) and hide the bdrNewHighscore container, switching the view to the bdrHighscoreList container.
But there are still a couple of things to do. First of all, these new screens (dead message, high score list etc.) needs to be hidden each time a new game is stared. So, the top of the StartNewGame() method, which we implemented in a previous article, should now look like this:
private void StartNewGame()
{
    bdrWelcomeMessage.Visibility = Visibility.Collapsed;
    bdrHighscoreList.Visibility = Visibility.Collapsed;
    bdrEndOfGame.Visibility = Visibility.Collapsed;
    ........
The next thing we need to do is to modify the EndGame() method. Instead of just displaying the MessageBox, we need to check if the user just made it into the high score list or not and then display the proper message container:
private void EndGame()
{
    bool isNewHighscore = false;
    if(currentScore > 0)
    {
    int lowestHighscore = (this.HighscoreList.Count > 0 ? this.HighscoreList.Min(x => x.Score) : 0);
    if((currentScore > lowestHighscore) || (this.HighscoreList.Count < MaxHighscoreListEntryCount))
    {
        bdrNewHighscore.Visibility = Visibility.Visible;
        txtPlayerName.Focus();
        isNewHighscore = true;
    }
    }
    if(!isNewHighscore)
    {
    tbFinalScore.Text = currentScore.ToString();
    bdrEndOfGame.Visibility = Visibility.Visible;
    }
    gameTickTimer.IsEnabled = false;
}
The method basically checks if there's still available spots in the high score list (we define a maximum of 5 entries) or if the user just beat one of the existing scores - if so, we allow the user to add their name by displaying the bdrNewHighscore container. If no new high score was accomplished, we display the bdrEndOfGame container instead. Be sure to define the MaxHighscoreListEntryCount constant:
const int MaxHighscoreListEntryCount = 5;I also modified the ContentRendered() method - now that we have a nice-looking welcome screen, we don't want the game to just start automatically. Instead, we urge the user to press Space to start the game or click a button to see the highscore list before the game begins, so we simply remove (or comment out) the call to StartNewGame():
private void Window_ContentRendered(object sender, EventArgs e)
{
    DrawGameArea();
    //StartNewGame();
}
With all that in place, start the game and do your best - as soon as the game ends, you should hopefully have made it into your brand new SnakeWPF high score list!
Summary
In this article, we made a LOT of improvements to our SnakeWPF implementation. The most obvious one is of course the high score list, which did require quite a bit of extra markup/code, but it was totally worth it! On top of that, we made some nice usability improvements, while once again making our project look even more like a real game.