The community is working on translating this tutorial into Galician, but it seems that no one has started the translation process for this article yet. If you can help us, then please click "More info".
WPF MultiTrigger and MultiDataTrigger
In the previous chapter, we worked with triggers to get dynamic styles. So far they have all been based on a single property, but WPF also supports multi triggers, which can monitor two or more property conditions and only trigger once all of them are satisfied.
There are two types of multi triggers: The MultiTrigger, which just like the regular Trigger works on dependency properties, and then the MultiDataTrigger, which works by binding to any kind of property. Let's start with a quick example on how to use the MultiTrigger.
MultiTrigger
<Window x:Class="WpfTutorialSamples.Styles.StyleMultiTriggerSample"
        xmlns="http://schemas.microsoft.com/winfx/2006/xaml/presentation"
        xmlns:x="http://schemas.microsoft.com/winfx/2006/xaml"
        Title="StyleMultiTriggerSample" Height="100" Width="250">
    <Grid>
        <TextBox VerticalAlignment="Center" HorizontalAlignment="Center" Text="Hover and focus here" Width="150">
            <TextBox.Style>
                <Style TargetType="TextBox">
                    <Style.Triggers>
                        <MultiTrigger>
                            <MultiTrigger.Conditions>
                                <Condition Property="IsKeyboardFocused" Value="True" />
                                <Condition Property="IsMouseOver" Value="True" />
                            </MultiTrigger.Conditions>
                            <MultiTrigger.Setters>
                                <Setter Property="Background" Value="LightGreen" />
                            </MultiTrigger.Setters>
                        </MultiTrigger>
                    </Style.Triggers>
                </Style>
            </TextBox.Style>
        </TextBox>
    </Grid>
</Window>
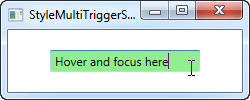
In this example, we use a trigger to change the background color of the TextBox once it has keyboard focus AND the mouse cursor is over it, as seen on the screenshot. This trigger has two conditions, but we could easily have added more if needed. In the Setters section, we define the properties we wish to change when all the conditions are met - in this case, just the one (background color).
MultiDataTrigger
Just like a regular DataTrigger, the MultiDataTrigger is cool because it uses bindings to monitor a property. This means that you can use all of the cool WPF binding techniques, including binding to the property of another control etc. Let me show you how easy it is:
<Window x:Class="WpfTutorialSamples.Styles.StyleMultiDataTriggerSample"
        xmlns="http://schemas.microsoft.com/winfx/2006/xaml/presentation"
        xmlns:x="http://schemas.microsoft.com/winfx/2006/xaml"
        Title="StyleMultiDataTriggerSample" Height="150" Width="200">
    <StackPanel HorizontalAlignment="Center" VerticalAlignment="Center">
        <CheckBox Name="cbSampleYes" Content="Yes" />
        <CheckBox Name="cbSampleSure" Content="I'm sure" />
        <TextBlock HorizontalAlignment="Center" Margin="0,20,0,0" FontSize="28">
            <TextBlock.Style>
                <Style TargetType="TextBlock">
                    <Setter Property="Text" Value="Unverified" />
                    <Setter Property="Foreground" Value="Red" />
                    <Style.Triggers>
                        <MultiDataTrigger>
                            <MultiDataTrigger.Conditions>
                                <Condition Binding="{Binding ElementName=cbSampleYes, Path=IsChecked}" Value="True" />
                                <Condition Binding="{Binding ElementName=cbSampleSure, Path=IsChecked}" Value="True" />
                            </MultiDataTrigger.Conditions>
                            <Setter Property="Text" Value="Verified" />
                            <Setter Property="Foreground" Value="Green" />
                        </MultiDataTrigger>
                    </Style.Triggers>
                </Style>
            </TextBlock.Style>
        </TextBlock>
    </StackPanel>
</Window>

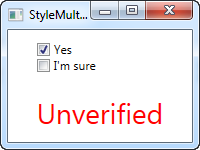
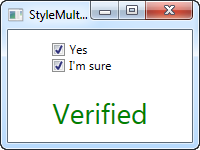
In this example, I've re-created the example we used with the regular DataTrigger, but instead of binding to just one property, I bind to the same property (IsChecked) but on two different controls. This allows us to trigger the style only once both checkboxes are checked - if you remove a check from either one of them, the default style will be applied instead.
Summary
As you can see, multi triggers are pretty much just as easy to use as regular triggers and they can be extremely useful, especially when developing your own controls.