This article is currently in the process of being translated into Hungarian (~25% done).
The StackPanel control
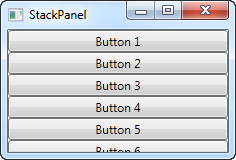
The StackPanel is very similar to the WrapPanel, but with at least one important difference: The StackPanel doesn't wrap the content. Instead it stretches it content in one direction, allowing you to stack item after item on top of each other. Let's first try a very simple example, much like we did with the WrapPanel:
<Window x:Class="WpfTutorialSamples.Panels.StackPanel"
        xmlns="http://schemas.microsoft.com/winfx/2006/xaml/presentation"
        xmlns:x="http://schemas.microsoft.com/winfx/2006/xaml"
        Title="StackPanel" Height="160" Width="300">
	<StackPanel>
		<Button>Button 1</Button>
		<Button>Button 2</Button>
		<Button>Button 3</Button>
		<Button>Button 4</Button>
		<Button>Button 5</Button>
		<Button>Button 6</Button>
	</StackPanel>
</Window>
Az első dolog, amit meg kell jegyeznünk az az, hogy a StackPanel nem foglalkozik azzal, hogy van-e elég hely a tartalom számára. Nem tünteti el a tartalmat valamilyen módon, és nem biztosítja automatikusan a legördítés lehetőségét sem számunkra ( a ScrollViewer vezérlőt használhatjuk ennek elérésére - amiről többet egy későbbi fejezetben olvashatunk).
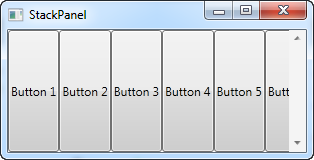
Azt is meg kell jegyeznünk, hogy az alapértelmezett irányultsága a StackPanel-nek a függőleges, ellentétben a WrapPanel-lel, aminél ez a vízszintes. De ugyanúgy, ahogyan a WrapPanel-nél is, könnyen megváltoztatható az irányultság az Orientation tulajdonság használatával:
<StackPanel Orientation="Horizontal">
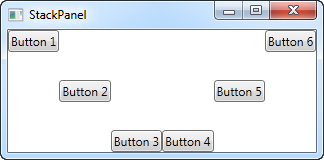
Another thing you will likely notice is that the StackPanel stretches its child control by default. On a vertically aligned StackPanel, like the one in the first example, all child controls get stretched horizontally. On a horizontally aligned StackPanel, all child controls get stretched vertically, as seen above. The StackPanel does this by setting the HorizontalAlignment or VerticalAlignment property on its child controls to Stretch, but you can easily override this if you want to. Have a look at the next example, where we use the same markup as we did in the previous example, but this time we assign values to the VerticalAlignment property for all the child controls:
<Window x:Class="WpfTutorialSamples.Panels.StackPanel"
        xmlns="http://schemas.microsoft.com/winfx/2006/xaml/presentation"
        xmlns:x="http://schemas.microsoft.com/winfx/2006/xaml"
        Title="StackPanel" Height="160" Width="300">
	<StackPanel Orientation="Horizontal">
		<Button VerticalAlignment="Top">Button 1</Button>
		<Button VerticalAlignment="Center">Button 2</Button>
		<Button VerticalAlignment="Bottom">Button 3</Button>
		<Button VerticalAlignment="Bottom">Button 4</Button>
		<Button VerticalAlignment="Center">Button 5</Button>
		<Button VerticalAlignment="Top">Button 6</Button>
	</StackPanel>
</Window>
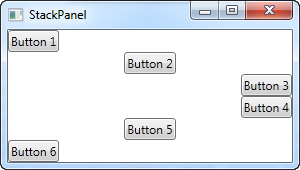
We use the Top, Center and Bottom values to place the buttons in a nice pattern, just for kicks. The same can of course be done for a vertically aligned StackPanel, where you would use the HorizontalAlignment on the child controls:
<Window x:Class="WpfTutorialSamples.Panels.StackPanel"
        xmlns="http://schemas.microsoft.com/winfx/2006/xaml/presentation"
        xmlns:x="http://schemas.microsoft.com/winfx/2006/xaml"
        Title="StackPanel" Height="160" Width="300">
	<StackPanel Orientation="Vertical">
		<Button HorizontalAlignment="Left">Button 1</Button>
		<Button HorizontalAlignment="Center">Button 2</Button>
		<Button HorizontalAlignment="Right">Button 3</Button>
		<Button HorizontalAlignment="Right">Button 4</Button>
		<Button HorizontalAlignment="Center">Button 5</Button>
		<Button HorizontalAlignment="Left">Button 6</Button>
	</StackPanel>
</Window>
As you can see, the controls still go from top to bottom, but instead of having the same width, each control is aligned to the left, the right or center.