This article is currently in the process of being translated into Japanese (~81% done).
The RadioButton control
RadioButtonコントロールはユーザーが同時に1つしか選択できないオプションのリストを作ります。もっと少ないスペースで同じ動作をするComboBoxコントロールがありますが、一組のラジオボタンは選択出来るオプション全体を把握しやすい傾向があります。
<Window x:Class="WpfTutorialSamples.Basic_controls.RadioButtonSample"
        xmlns="http://schemas.microsoft.com/winfx/2006/xaml/presentation"
        xmlns:x="http://schemas.microsoft.com/winfx/2006/xaml"
        Title="RadioButtonSample" Height="150" Width="250">
	<StackPanel Margin="10">
		<Label FontWeight="Bold">Are you ready?</Label>
		<RadioButton>Yes</RadioButton>
		<RadioButton>No</RadioButton>
		<RadioButton IsChecked="True">Maybe</RadioButton>
	</StackPanel>
</Window>
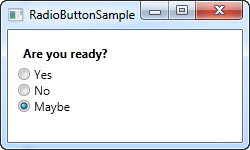
行ったことの全ては、質問を書いたLabelと選択肢を書いた3つのラジオボタンを加えただけです。ユーザーが上のいづれかのボタンをクリックして変更できるように、最後のラジオボタンはIsCheckedプロパティを使ってデフォルトに設定します。このプロパティはコードビハインドからRadioButtonがチェックされているかどうかを調べるために使うプロパティでもあります。
ラジオボタングループ
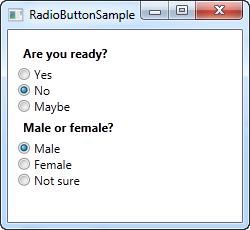
上の例を走らせると、仕様の通りに、同時にただ一つのラジオボタンが選択されるのがわかります。しかし、それぞれが個別の選択を持ついくつかのラジオボタンのグループが有る場合はどうでしょうか?これはGroupNameプロパティが可能にします。このプロパティはどのラジオボタンがどのグループに属するのか指定します。以下が例です。
<Window x:Class="WpfTutorialSamples.Basic_controls.RadioButtonSample"
        xmlns="http://schemas.microsoft.com/winfx/2006/xaml/presentation"
        xmlns:x="http://schemas.microsoft.com/winfx/2006/xaml"
        Title="RadioButtonSample" Height="230" Width="250">
	<StackPanel Margin="10">
		<Label FontWeight="Bold">Are you ready?</Label>
		<RadioButton GroupName="ready">Yes</RadioButton>
		<RadioButton GroupName="ready">No</RadioButton>
		<RadioButton GroupName="ready" IsChecked="True">Maybe</RadioButton>

		<Label FontWeight="Bold">Male or female?</Label>
		<RadioButton GroupName="sex">Male</RadioButton>
		<RadioButton GroupName="sex">Female</RadioButton>
		<RadioButton GroupName="sex" IsChecked="True">Not sure</RadioButton>
	</StackPanel>
</Window>
それぞれのボタンにGroupName propertyプロパティを設定することで、二つのグループそれぞれで選択できるようになります。これをしないと、6つのラジオボタンでただ一つの選択になります。
カスタムコンテンツ
RadioButtonコントロールはContentControlクラスを継承していて、これはカスタムコンテンツを取得してそれを表示できることを意味します。上の例のように短いテキストを設定した場合、WPFは内部でTextBlockコントロールを置いて表示します。これは事物を簡単にするための近道です。次の例が示すように、あらゆるタイプのコントロールを内部で使うことが出来ます。
<Window x:Class="WpfTutorialSamples.Basic_controls.RadioButtonCustomContentSample"
        xmlns="http://schemas.microsoft.com/winfx/2006/xaml/presentation"
        xmlns:x="http://schemas.microsoft.com/winfx/2006/xaml"
        Title="RadioButtonCustomContentSample" Height="150" Width="250">
	<StackPanel Margin="10">
		<Label FontWeight="Bold">Are you ready?</Label>
		<RadioButton>
			<WrapPanel>
				<Image Source="/WpfTutorialSamples;component/Images/accept.png" Width="16" Height="16" Margin="0,0,5,0" />
				<TextBlock Text="Yes" Foreground="Green" />
			</WrapPanel>
		</RadioButton>
		<RadioButton Margin="0,5">
			<WrapPanel>
				<Image Source="/WpfTutorialSamples;component/Images/cancel.png" Width="16" Height="16" Margin="0,0,5,0" />
				<TextBlock Text="No" Foreground="Red" />
			</WrapPanel>
		</RadioButton>
		<RadioButton IsChecked="True">
			<WrapPanel>
				<Image Source="/WpfTutorialSamples;component/Images/question.png" Width="16" Height="16" Margin="0,0,5,0" />
				<TextBlock Text="Maybe" Foreground="Gray" />
			</WrapPanel>
		</RadioButton>
	</StackPanel>
</Window>
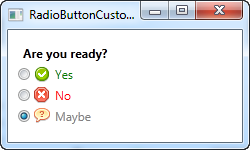
マークアップに関して、この例は少し重いですが、考え方はシンプルです。それぞれのラジオボタンにイメージと短いテキストを内部に持ったWrapPanelがあります。これで、TextBlockコントロールを使ってテキストを制御できるようになったため、自由にテキストの書式設定が出来ます。この例ではそれぞれの選択でテキストの色を変えました。それぞれの選択肢のイメージを表示するためにImageコントロールを使いました。
ラジオボタンのどこでも、イメージやテキストでもクリックすればラジオボタンがONに切り替わることに注意して下さい。何故ならそれらをラジオボタンのコンテンツに指定しているからです。もしそれらを個別のパネルとしてラジオボタンの横に置いたら、ユーザーはラジオボタンの丸い部分をクリックする必要があります。これは実用性に欠けます。