This article has been localized into Korean by the community.
Canvas 컨트롤
Canvas는 아마 가장 간단한 패널일 것입니다. 기본적으로 아무것도 하지 않습니다. Canvas 패널은 명확한 좌표를 사용한 컨트롤을 배치합니다.
WinForm과 같은 다른 UI 라이브러리를 사용했다면 아마 집에 있는 것처럼 느껴질 것입니다. 모든 자식 컨트롤을 절대적으로 제어할 수는 있지만, 사용자가 윈도우 크기를 조정하거나 하면 절대좌표에 배치된 텍스트나 컨텐츠의 비율를 위해 패널은 아무 동작도 하지 않습니다.
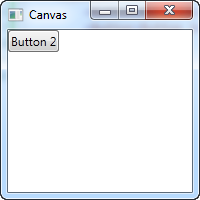
다음에 그 간단한 예제가 있습니다. 이것은 캔버스가 기본적으로 얼마나 적은 기능을 하는지 보여주는 것입니다.
<Window x:Class="WpfTutorialSamples.Panels.Canvas"
        xmlns="http://schemas.microsoft.com/winfx/2006/xaml/presentation"
        xmlns:x="http://schemas.microsoft.com/winfx/2006/xaml"
        Title="Canvas" Height="200" Width="200">
	<Canvas>
		<Button>Button 1</Button>
		<Button>Button 2</Button>
	</Canvas>
</Window>
보시다시피, 우리는 두 개의 버튼을 가지고 있지만, 정확히 동일한 위치에 놓여 있으므로 마지막 버튼 만 보입니다. Canvas는 자식 컨트롤에 좌표를 제공하기 전까지는 아무 것도하지 않습니다. 이것은 Canvas 컨트롤의 Left, Right, Top 및 Bottom 속성을 사용하여 좌표를 줄 수 있습니다.
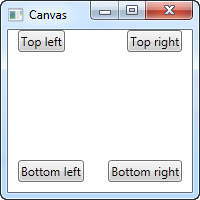
이 속성들은 Canvas의 네 모서리를 기준으로 위치를 지정합니다. 기본적으로 모두 NaN (Not a Number)으로 설정되고, 기본값은 Canvas를 왼쪽 위 모서리에 위치하지만, 말했듯이 이는 쉽게 변경할 수 있습니다.
<Window x:Class="WpfTutorialSamples.Panels.Canvas"
        xmlns="http://schemas.microsoft.com/winfx/2006/xaml/presentation"
        xmlns:x="http://schemas.microsoft.com/winfx/2006/xaml"
        Title="Canvas" Height="200" Width="200">
	<Canvas>
		<Button Canvas.Left="10">Top left</Button>
		<Button Canvas.Right="10">Top right</Button>
		<Button Canvas.Left="10" Canvas.Bottom="10">Bottom left</Button>
		<Button Canvas.Right="10" Canvas.Bottom="10">Bottom right</Button>
	</Canvas>
</Window>
사용자가 필요한 속성들만 설정한다는 것에 주목하십시오. 첫 번째 두 개의 버튼에 대해서는 Left 및 Right 속성을 사용하여 X 축의 값만 지정을 했고, 각 방향에서 버튼을 안쪽으로 밀어 넣습니다.
아래쪽 버튼의 경우 Left/Right 속성과 함께 Bottom을 사용하여 두 방향으로 안쪽으로 밀어냅니다. 일반적으로 Top 또는 Bottom 값 또는 Left 또는 Right 값을 지정합니다.
말했듯이 Canvas는 위치를 완벽하게 제어 할 수 있기 때문에, 모든 컨트롤을 위한 충분한 공간이 있는지 또는 다른 컨트롤의 상단에 있는지 여부는 실제로 신경 쓰지 않습니다. 이것은 다이얼로그 디자인 종류들 중에 상당히 나쁜 방법이지만, Canvas는 이름에서 보다시피 그림을 그리는 디자인에 적합합니다. WPF에는 멋진 그림을 만들기 위해 Canvas 내부에 배치할 수 있는 많은 컨트롤이 있습니다.
Z-Index
다음 예제에서는 WPF의 Z-Index라는 매우 중요한 개념을 설명하기 위해 도형 관련 컨트롤 몇 가지를 사용할 겁니다. 일반적으로 Canvas 내의 두 컨트롤이 겹치면 마크 업에서 마지막으로 정의된 컨트롤이 우선 적용되고 다른 컨트롤들이 겹쳐지게 됩니다. 그러나 Panel 클래스에 연결된 ZIndex 속성을 사용하면 이 순서를 쉽게 변경할 수 있습니다.
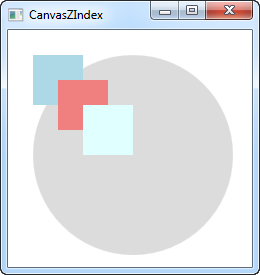
우선 z-index를 전혀 사용하지 않는 예제를 먼저 보시겠습니다.
<Window x:Class="WpfTutorialSamples.Panels.CanvasZIndex"
        xmlns="http://schemas.microsoft.com/winfx/2006/xaml/presentation"
        xmlns:x="http://schemas.microsoft.com/winfx/2006/xaml"
        Title="CanvasZIndex" Height="275" Width="260">
    <Canvas>
        <Ellipse Fill="Gainsboro" Canvas.Left="25" Canvas.Top="25" Width="200" Height="200" />
        <Rectangle Fill="LightBlue" Canvas.Left="25" Canvas.Top="25" Width="50" Height="50" />
        <Rectangle Fill="LightCoral" Canvas.Left="50" Canvas.Top="50" Width="50" Height="50" />
        <Rectangle Fill="LightCyan" Canvas.Left="75" Canvas.Top="75" Width="50" Height="50" />
    </Canvas>
</Window>
각 직사각형은 원보다 나중에 정의되기 때문에, 사각형들은 모두 원과 겹치고, 자기들끼리도 이전에 정의된 사각형과 겹쳐집니다. 예제를 다음과 같이 변경해 보겠습니다.
<Window x:Class="WpfTutorialSamples.Panels.CanvasZIndex"
        xmlns="http://schemas.microsoft.com/winfx/2006/xaml/presentation"
        xmlns:x="http://schemas.microsoft.com/winfx/2006/xaml"
        Title="CanvasZIndex" Height="275" Width="260">
    <Canvas>
        <Ellipse Panel.ZIndex="2" Fill="Gainsboro" Canvas.Left="25" Canvas.Top="25" Width="200" Height="200" />
        <Rectangle Panel.ZIndex="3" Fill="LightBlue" Canvas.Left="25" Canvas.Top="25" Width="50" Height="50" />
        <Rectangle Panel.ZIndex="2" Fill="LightCoral" Canvas.Left="50" Canvas.Top="50" Width="50" Height="50" />
        <Rectangle Panel.ZIndex="4" Fill="LightCyan" Canvas.Left="75" Canvas.Top="75" Width="50" Height="50" />
    </Canvas>
</Window>
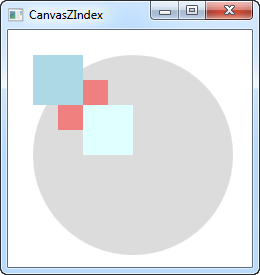
ZIndex의 기본값은 0이지만 각 도형에 새 값을 할당해 봅시다. 보다 높은 z-index를 가진 컨트롤은 낮은 값을 가진 컨트롤 위에 올라옵니다. z-index의 값이 동일하면 나중에 정의된 컨트롤이 위로 올라옵니다. 스크린 샷에서 볼 수 있듯이 ZIndex 속성을 변경하면 다른 결과를 얻을 수 있습니다.