This article is currently in the process of being translated into Korean (~95% done).
The Image control
WPF 이미지 컨트롤은 응용 프로그램 내부에 이미지를 표시할 수 있습니다. 그건 매우 다양한 컨트롤이며, 많은 유용한 옵션과 방법들이 있고, 이 글에서 배울겁니다. 하지만 먼저, 가장 기본적인 창 안에 이미지를 표시하는 예제를 봅시다.
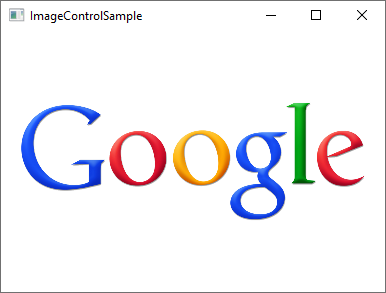
<Image Source="https://upload.wikimedia.org/wikipedia/commons/3/30/Googlelogo.png" />결과는 다음과 같이 나타날 겁니다.

그 소스속성은, 예시에서는 표시해야 할 이미지를 지정하는데 쓰였습니다. 그건 아마도 가장 중요한 컨트롤이며, 따라서 이 주제에 대해 파헤쳐 봅시다.
The Source property
이 예제에서 볼 수 있듯이, Source 속성은 Image 컨트롤에서 어떤 이미지가 표시해야하는 지 쉽게 명시할 수 있도록 해줍니다. 예를 들어, 위의 예시에서는 원격이미지(remote image) 를 표시하였는데, Image 컨트롤은 이를 자동으로 패치한 뒤 표시해줍니다. 이것은 Image 컨트롤이 얼마나 유연한지 알려주는 좋은 예시이지만, 거의 대부분의 경우, 여러분은 원격이미지를 쓰기보단, 어플리케이션에 묶이는(Bundle) 이미지를 쓰고자 할 것입니다. 이것 또한 쉽게 할 수 있습니다.
아시다시피, 여러분은 프로젝트에 리소스 파일을 추가할 수 있습니다. 리소스 파일들은 Visual Studio 프로젝트 안에 포함될 수 있으며, 다른 파일들(Windows, User Controls 등등)과 마찬가지로 Solution Explorer 에서 확인 할 수 있습니다. 여러분은 리소스 파일로써 image 파일을 프로젝트 폴더 안에 넣을 수 있습니다. 여러분이 VS 에 별도의 세팅을 하지 않은 한, 이 파일들은 application 에 컴파일될 것입니다. 그리고 이 파일들에 접근하기 위해서 URL format 을 이용할 수 있습니다. 만약 여러분이 "google.png" 라는 이미지 파일을 "Images" 폴더 안에 추가했다면, 다음과 같이 접근할 수 있습니다.
<Image Source="/WpfTutorialSamples;component/Images/google.png" />URI's 라는 것은(종종 "Pack URI's" 라고 불리기도 합니다.) 그 자체로 아주 많은 내용이 있는 주제입니다만, 일단 당장에는 이것이 두 개의 파트로 나뉘어져있다는 사실에 주목합시다.
- 첫번째 파트(/WpfTutorialSamples;component)는 assembly name (이 경우, WpfTutorialSamples)이 단어(word) "component" 와 결합되는 부분입니다.
- 두번째 파트는 resource 파일의 상대 경로입니다. (/Images/google.png)
이러한 구문을 통해서, 여러분은 여러분의 application 에 있는 resource 들을 쉽게 참조할 수 있습니다. 이를 좀 더 쉽게 하기 위헤서 WPF 프레임워크는 simple relative URL 형식을 제공합니다. - 거의 대부분의 경우에는 이것을 사용해도 충분합니다. 만약 여러분이 resources 들과 관련해서 좀 더 복잡한 application 을 개발하고 있는 것이 아니라면 말이죠. 이 simple relative URL 은 다음과 같은 형태입니다.
<Image Source="/Images/google.png" />동적으로 이미지 읽어오기 (Code-behind)
거의 대부분의 경우 XAML 을 이용해서 Image 의 Source 를 직접 명시하는 것으로 충분합니다만, 때때로 image 를 동적으로 로드해와야할 필요가 있는 경우가 있습니다. 예를 들어 유저의 선택에 따라서 표시를 달리해야하는 경우가 있겠죠. 이는 Code-behind 를 통해서 할 수 있습니다. 다음은 OpenFileDialog 를 통해, 유저가 선택한 image 를 어떻게 로드해오는지를 알려줍니다.
private void BtnLoadFromFile_Click(object sender, RoutedEventArgs e)
{
    OpenFileDialog openFileDialog = new OpenFileDialog();
    if(openFileDialog.ShowDialog() == true)
    {
    Uri fileUri = new Uri(openFileDialog.FileName);
    imgDynamic.Source = new BitmapImage(fileUri);
    }
}
BitmapImage instance 를 어떻게 만드는지에 주목해주세요. 저는 dialog 를 통해서 선택된 path 를 기반으로 Uri object 를 만들었고, 이를 인자로 건네주었습니다. 우리는 이와 완전히 동일한 방법으로 application에 포함되어있는 image resource 를 로드해올 수 있습니다.
private void BtnLoadFromResource_Click(object sender, RoutedEventArgs e)
{
    Uri resourceUri = new Uri("/Images/white_bengal_tiger.jpg", UriKind.Relative);
    imgDynamic.Source = new BitmapImage(resourceUri);
}
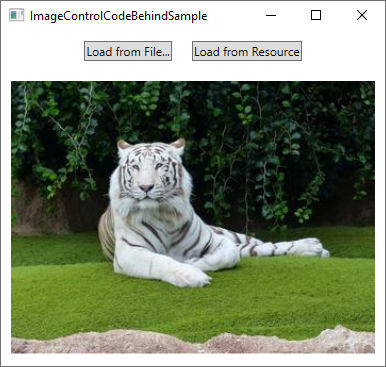
앞서 예시에서 사용했던 것과 같은 상대 경로를 이용하겠습니다. 다만, UriKind.Relative 인자를 Uri instance 를 만들 때 넘겨야만 합니다. 이렇게 함으로써 넘겨진 path 가 절대 경로인지, 상대 경로인지 판단할 수 있습니다. 다음은 XAML 소스와 스크린샷입니다.
<Window x:Class="WpfTutorialSamples.Basic_controls.ImageControlCodeBehindSample"
    xmlns="http://schemas.microsoft.com/winfx/2006/xaml/presentation"
    xmlns:x="http://schemas.microsoft.com/winfx/2006/xaml"
    xmlns:d="http://schemas.microsoft.com/expression/blend/2008"
    xmlns:mc="http://schemas.openxmlformats.org/markup-compatibility/2006"
    xmlns:local="clr-namespace:WpfTutorialSamples.Basic_controls"
    mc:Ignorable="d"
    Title="ImageControlCodeBehindSample" Height="300" Width="400">
    <StackPanel>
    <WrapPanel Margin="10" HorizontalAlignment="Center">
        <Button Name="btnLoadFromFile" Margin="0,0,20,0" Click="BtnLoadFromFile_Click">Load from File...</Button>
        <Button Name="btnLoadFromResource" Click="BtnLoadFromResource_Click">Load from Resource</Button>
    </WrapPanel>
    <Image Name="imgDynamic" Margin="10"  />
    </StackPanel>
</Window>
The Stretch property
저는 Stretch property 가 Image 컨트롤의 property 들 중에서 Source property 다음으로 가장 흥미로운 property 라고 생각합니다. 이것은 로드한 image 의 너비, 높이가 Image 컨트롤의 너비, 높이와 다른 경우에 무슨 일이 벌어지는 지를 결정합니다. 이러한 일은 항상 있을 수 있습니다. 사용자가 Windows 의 사이즈를 조절할 수 있을 때, 여러분의 Layout 이 고정된게 아니라면, Image 컨트롤의 사이즈 또한 항상 변할 수 있기 때문입니다.
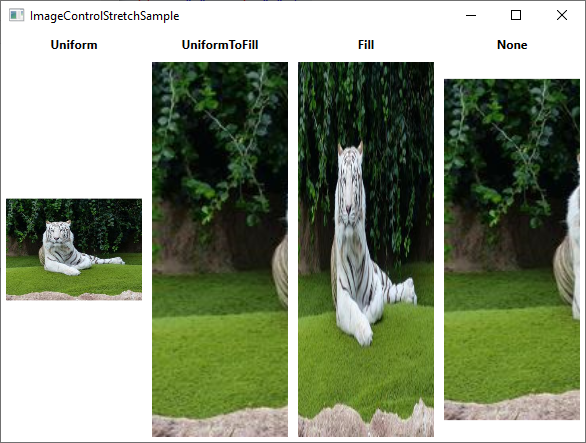
다음 예시에서 볼 수 있듯이, Stretch property 는 그 값에 따라, image 가 어떻게 표시될지 조금씩 차이를 줍니다.

<Window x:Class="WpfTutorialSamples.Basic_controls.ImageControlStretchSample"
    xmlns="http://schemas.microsoft.com/winfx/2006/xaml/presentation"
    xmlns:x="http://schemas.microsoft.com/winfx/2006/xaml"
    xmlns:d="http://schemas.microsoft.com/expression/blend/2008"
    xmlns:mc="http://schemas.openxmlformats.org/markup-compatibility/2006"
    xmlns:local="clr-namespace:WpfTutorialSamples.Basic_controls"
    mc:Ignorable="d"
    Title="ImageControlStretchSample" Height="450" Width="600">
    <Grid>
    <Grid.ColumnDefinitions>
        <ColumnDefinition Width="*" />
        <ColumnDefinition Width="*" />
        <ColumnDefinition Width="*" />
        <ColumnDefinition Width="*" />
    </Grid.ColumnDefinitions>
    <Grid.RowDefinitions>
        <RowDefinition Height="Auto" />
        <RowDefinition Height="*" />
    </Grid.RowDefinitions>
    <Label Grid.Column="0" HorizontalAlignment="Center" FontWeight="Bold">Uniform</Label>
    <Label Grid.Column="1" HorizontalAlignment="Center" FontWeight="Bold">UniformToFill</Label>
    <Label Grid.Column="2" HorizontalAlignment="Center" FontWeight="Bold">Fill</Label>
    <Label Grid.Column="3" HorizontalAlignment="Center" FontWeight="Bold">None</Label>
    <Image Source="/Images/white_bengal_tiger.jpg" Stretch="Uniform" Grid.Column="0" Grid.Row="1" Margin="5" />
    <Image Source="/Images/white_bengal_tiger.jpg" Stretch="UniformToFill" Grid.Column="1" Grid.Row="1" Margin="5" />
    <Image Source="/Images/white_bengal_tiger.jpg" Stretch="Fill" Grid.Column="2" Grid.Row="1" Margin="5" />
    <Image Source="/Images/white_bengal_tiger.jpg" Stretch="None" Grid.Column="3" Grid.Row="1" Margin="5" />
    </Grid>
</Window>
말로 설명하기 어렵지만, 모든 Image control 은 같은 image 를 표시중이고, 단지 각자가 지닌 Stretch property 가 다릅니다. 다음은 서로 다른 설정(mode) 이 어떻게 동작하는지 나타낸 것입니다.
- Uniform: 이것은 default mode 입니다. image 는 자동으로 스케일 되어, 영역안에 딱 맞도록 표시될 것입니다. 이미지의 종횡비 (Aspect ratio) 는 유지됩니다.
- UniformToFill: 이미지가 영역 전체에 표시되도록, 스케일이 자동으로 조정됩니다. 마찬가지로 이미지의 종횡비는 유지됩니다.
- Fill: 이미지 전체가 영역 전체에 표시되도록, 이미지의 스케일이 조정됩니다. 이미지의 가로/세로길이와 영역의 가로/세로길이 및 각각의 종횡비가 다를 수 있기에, 이미지의 종횡비는 유지되지 않습니다.
- None: 만약 이미지가 Image 컨트롤보다 작다면, 아무 것도 하지 않습니다. 하지만 이미지가 Image 컨트롤보다 커지면, 영역 내에 보일 수 있는 부분만이 보이게 되고, 나머지는 가려집니다.
요약
이미지가 원격 source 로부터 가져오는 것이든, 개인 컴퓨터에 있는 것이든, 여러분이 만약 application 에 이미지를 표시하고자 한다면, WPF 의 Image 컨트롤을 이용해서 이를 쉽게 할 수 있습니다.