The community is working on translating this tutorial into Urdu, but it seems that no one has started the translation process for this article yet. If you can help us, then please click "More info".
Using the DataContext
The DataContext property is the default source of your bindings, unless you specifically declare another source, like we did in the previous chapter with the ElementName property. It's defined on the FrameworkElement class, which most UI controls, including the WPF Window, inherits from. Simply put, it allows you to specify a basis for your bindings
There's no default source for the DataContext property (it's simply null from the start), but since a DataContext is inherited down through the control hierarchy, you can set a DataContext for the Window itself and then use it throughout all of the child controls. Let's try illustrating that with a simple example:
<Window x:Class="WpfTutorialSamples.DataBinding.DataContextSample"
        xmlns="http://schemas.microsoft.com/winfx/2006/xaml/presentation"
        xmlns:x="http://schemas.microsoft.com/winfx/2006/xaml"
        Title="DataContextSample" Height="130" Width="280">
	<StackPanel Margin="15">
		<WrapPanel>
			<TextBlock Text="Window title:  " />
			<TextBox Text="{Binding Title, UpdateSourceTrigger=PropertyChanged}" Width="150" />
		</WrapPanel>
		<WrapPanel Margin="0,10,0,0">
			<TextBlock Text="Window dimensions: " />
			<TextBox Text="{Binding Width}" Width="50" />
			<TextBlock Text=" x " />
			<TextBox Text="{Binding Height}" Width="50" />
		</WrapPanel>
	</StackPanel>
</Window>
using System;
using System.Windows;
namespace WpfTutorialSamples.DataBinding
{
public partial class DataContextSample : Window
{
public DataContextSample()
{
InitializeComponent();
this.DataContext = this;
}
}
}
The Code-behind for this example only adds one line of interesting code: After the standard InitalizeComponent() call, we assign the "this" reference to the DataContext, which basically just tells the Window that we want itself to be the data context.
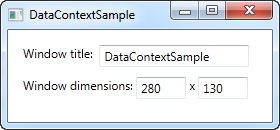
In the XAML, we use this fact to bind to several of the Window properties, including Title, Width and Height. Since the window has a DataContext, which is passed down to the child controls, we don't have to define a source on each of the bindings - we just use the values as if they were globally available.
Try running the example and resize the window - you will see that the dimension changes are immediately reflected in the textboxes. You can also try writing a different title in the first textbox, but you might be surprised to see that this change is not reflected immediately. Instead, you have to move the focus to another control before the change is applied. Why? Well, that's the subject for the next chapter.
Summary
Using the DataContext property is like setting the basis of all bindings down through the hierarchy of controls. This saves you the hassle of manually defining a source for each binding, and once you really start using data bindings, you will definitely appreciate the time and typing saved.
However, this doesn't mean that you have to use the same DataContext for all controls within a Window. Since each control has its own DataContext property, you can easily break the chain of inheritance and override the DataContext with a new value. This allows you to do stuff like having a global DataContext on the window and then a more local and specific DataContext on e.g. a panel holding a separate form or something along those lines.