This article has been localized into Chinese by the community.
資料綁定:
通过后置代码进行数据绑定
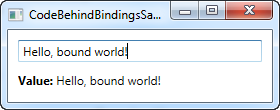
正如我们在之前的数据绑定示例中看到的那样,使用XAML定义绑定非常简单,但是对于某些情况,您可能希望从后置代码中执行此操作。 这也非常简单,并提供与使用XAML时完全相同的可能性。 让我们尝试“Hello,bound world”示例,但这一次从后置代码创建所需的绑定:
<Window x:Class="WpfTutorialSamples.DataBinding.CodeBehindBindingsSample"
    xmlns="http://schemas.microsoft.com/winfx/2006/xaml/presentation"
    xmlns:x="http://schemas.microsoft.com/winfx/2006/xaml"
    Title="CodeBehindBindingsSample" Height="110" Width="280">
    <StackPanel Margin="10">
    <TextBox Name="txtValue" />
    <WrapPanel Margin="0,10">
        <TextBlock Text="Value: " FontWeight="Bold" />
        <TextBlock Name="lblValue" />
    </WrapPanel>
    </StackPanel>
</Window>
using System;
using System.Windows;
using System.Windows.Controls;
using System.Windows.Data;
namespace WpfTutorialSamples.DataBinding
{
public partial class CodeBehindBindingsSample : Window
{
public CodeBehindBindingsSample()
{
InitializeComponent();
Binding binding = new Binding("Text");
binding.Source = txtValue;
lblValue.SetBinding(TextBlock.TextProperty, binding);
}
}
}
它的工作原理是创建一个Binding实例。 我们直接在构造函数中指定我们想要的路径,在本例中为“Text”,因为我们要绑定到Text属性。 然后我们指定一个Source,对于这个例子,它应该是TextBox控件。 现在WPF知道它应该使用TextBox作为源控件,而且我们指定找包含在其Text属性的值。
在最后一行中,我们使用SetBinding方法将新创建的Binding对象与目的/目标控件,在本例中为TextBlock (lblValue)组合在一起。 SetBinding()方法接受两个参数,一个用于指示我们要绑定到哪个依赖项属性,另一个用于保存我们希望使用的绑定对象。
小结
正如您所看到的,与在XAML中内创建它们的语法相比,在C#代码中创建绑定也很容易,对于刚接触数据绑定的人来说可能更容易掌握。 你使用哪种方法取决于你 - 它们都工作得很好。
This article has been fully translated into the following languages:
Is your preferred language not on the list? Click here to help us translate this article into your language!