The community is working on translating this tutorial into Kannada, but it seems that no one has started the translation process for this article yet. If you can help us, then please click "More info".
The RadioButton control
The RadioButton control allows you to give your user a list of possible options, with only one of them selected at the same time. You can achieve the same effect, using less space, with the ComboBox control, but a set of radio buttons tend to give the user a better overview of the options they have.
<Window x:Class="WpfTutorialSamples.Basic_controls.RadioButtonSample"
        xmlns="http://schemas.microsoft.com/winfx/2006/xaml/presentation"
        xmlns:x="http://schemas.microsoft.com/winfx/2006/xaml"
        Title="RadioButtonSample" Height="150" Width="250">
	<StackPanel Margin="10">
		<Label FontWeight="Bold">Are you ready?</Label>
		<RadioButton>Yes</RadioButton>
		<RadioButton>No</RadioButton>
		<RadioButton IsChecked="True">Maybe</RadioButton>
	</StackPanel>
</Window>
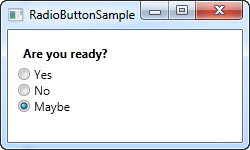
All we do is add a Label with a question, and then three radio buttons, each with a possible answer. We define a default option by using the IsChecked property on the last RadioButton, which the user can change simply by clicking on one of the other radio buttons. This is also the property you would want to use from Code-behind to check if a RadioButton is checked or not.
RadioButton groups
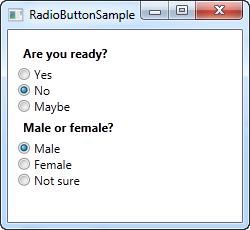
If you try running the example above, you will see that, as promised, only one RadioButton can be checked at the same time. But what if you want several groups of radio buttons, each with their own, individual selection? This is what the GroupName property comes into play, which allows you to specify which radio buttons belong together. Here's an example:
<Window x:Class="WpfTutorialSamples.Basic_controls.RadioButtonSample"
        xmlns="http://schemas.microsoft.com/winfx/2006/xaml/presentation"
        xmlns:x="http://schemas.microsoft.com/winfx/2006/xaml"
        Title="RadioButtonSample" Height="230" Width="250">
	<StackPanel Margin="10">
		<Label FontWeight="Bold">Are you ready?</Label>
		<RadioButton GroupName="ready">Yes</RadioButton>
		<RadioButton GroupName="ready">No</RadioButton>
		<RadioButton GroupName="ready" IsChecked="True">Maybe</RadioButton>

		<Label FontWeight="Bold">Male or female?</Label>
		<RadioButton GroupName="sex">Male</RadioButton>
		<RadioButton GroupName="sex">Female</RadioButton>
		<RadioButton GroupName="sex" IsChecked="True">Not sure</RadioButton>
	</StackPanel>
</Window>
With the GroupName property set on each of the radio buttons, a selection can now be made for each of the two groups. Without this, only one selection for all six radio buttons would be possible.
Custom content
The RadioButton inherits from the ContentControl class, which means that it can take custom content and display next to it. If you just specify a piece of text, like I did in the example above, WPF will put it inside a TextBlock control and display it, but this is just a shortcut to make things easier for you. You can use any type of control inside of it, as we'll see in the next example:
<Window x:Class="WpfTutorialSamples.Basic_controls.RadioButtonCustomContentSample"
        xmlns="http://schemas.microsoft.com/winfx/2006/xaml/presentation"
        xmlns:x="http://schemas.microsoft.com/winfx/2006/xaml"
        Title="RadioButtonCustomContentSample" Height="150" Width="250">
	<StackPanel Margin="10">
		<Label FontWeight="Bold">Are you ready?</Label>
		<RadioButton>
			<WrapPanel>
				<Image Source="/WpfTutorialSamples;component/Images/accept.png" Width="16" Height="16" Margin="0,0,5,0" />
				<TextBlock Text="Yes" Foreground="Green" />
			</WrapPanel>
		</RadioButton>
		<RadioButton Margin="0,5">
			<WrapPanel>
				<Image Source="/WpfTutorialSamples;component/Images/cancel.png" Width="16" Height="16" Margin="0,0,5,0" />
				<TextBlock Text="No" Foreground="Red" />
			</WrapPanel>
		</RadioButton>
		<RadioButton IsChecked="True">
			<WrapPanel>
				<Image Source="/WpfTutorialSamples;component/Images/question.png" Width="16" Height="16" Margin="0,0,5,0" />
				<TextBlock Text="Maybe" Foreground="Gray" />
			</WrapPanel>
		</RadioButton>
	</StackPanel>
</Window>
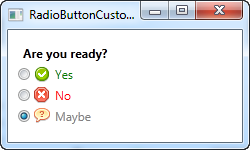
Markup-wise, this example gets a bit heavy, but the concept is pretty simple. For each RadioButton, we have a WrapPanel with an image and a piece of text inside of it. Since we now take control of the text using a TextBlock control, this also allows us to format the text in any way we want to. For this example, I have changed the text color to match the choice. An Image control (read more about those later) is used to display an image for each choice.
Notice how you can click anywhere on the RadioButton, even on the image or the text, to toggle it on, because we have specified it as content of the RadioButton. If you had placed it as a separate panel, next to the RadioButton, the user would have to click directly on the round circle of the RadioButton to activate it, which is less practical.