This article is currently in the process of being translated into Korean (~94% done).
Data binding via Code-behind
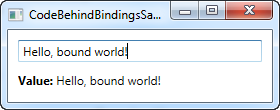
이전 데이터 바인딩 예제에서 보았 듯이 XAML을 사용하여 바인딩을 정의하는 것은 매우 쉽지만 경우에 따라 대신 코드 숨김에서 이를 수행 할 수 있습니다. 이것은 매우 쉽고 XAML을 사용할 때와 똑같은 가능성을 제공합니다. "Hello, bound world"예제를 시도해 보겠습니다. 이번에는 Code-behind에서 필요한 바인딩을 만듭니다.
<Window x:Class="WpfTutorialSamples.DataBinding.CodeBehindBindingsSample"
    xmlns="http://schemas.microsoft.com/winfx/2006/xaml/presentation"
    xmlns:x="http://schemas.microsoft.com/winfx/2006/xaml"
    Title="CodeBehindBindingsSample" Height="110" Width="280">
    <StackPanel Margin="10">
    <TextBox Name="txtValue" />
    <WrapPanel Margin="0,10">
        <TextBlock Text="Value: " FontWeight="Bold" />
        <TextBlock Name="lblValue" />
    </WrapPanel>
    </StackPanel>
</Window>
using System;
using System.Windows;
using System.Windows.Controls;
using System.Windows.Data;
namespace WpfTutorialSamples.DataBinding
{
public partial class CodeBehindBindingsSample : Window
{
public CodeBehindBindingsSample()
{
InitializeComponent();
Binding binding = new Binding("Text");
binding.Source = txtValue;
lblValue.SetBinding(TextBlock.TextProperty, binding);
}
}
}
Binding 인스턴스를 만들어 작동합니다. Text 속성에 바인딩하기 때문에 생성자에서 직접 원하는 경로 (이 경우 "Text")를 지정합니다. 그런 다음 Source를 지정합니다.이 예제에서는 TextBox 컨트롤이어야합니다. 이제 WPF는 TextBox를 소스 컨트롤로 사용해야하며 Text 속성에 포함 된 값을 구체적으로 찾고 있음을 알고 있습니다.
마지막 줄에서 SetBinding 메서드를 사용하여 새로 만든 Binding 개체를 목적 / 대상 컨트롤 (이 경우 TextBlock (lblValue))과 결합합니다.SetBinding() 메서드는 바인딩하려는 종속성 속성을 알려주는 매개 변수와 사용하려는 바인딩 개체를 보유하는 두 개의 매개 변수를 사용합니다.
요약
보시다시피, C # 코드에서 바인딩을 만드는 것은 쉽고 XAML에서 인라인을 만드는 데 사용되는 구문과 비교할 때 데이터 바인딩을 처음 접하는 사람들을 이해하기가 조금 더 쉽습니다. 당신이 사용하는 방법은 당신에게 달려 있습니다. 둘 다 잘 작동합니다.