This article is currently in the process of being translated into Dutch (~45% done).
Het DockPanel-besturingselement
Het DockPanel besturingselement maakt het makkelijk om onderdelen van je UI te koppelen aan alle vier de richting (boven, beneden, links, en rechts). Dit maakt dat het een uitstekende keus is in veel situaties waar je het applicatievenster in specifieke delen wilt splitsen, vooral omdat het laatste element in het DockPanel standaard de rest van het venster opvult (het midden), tenzij dit specifiek is uitgezet.
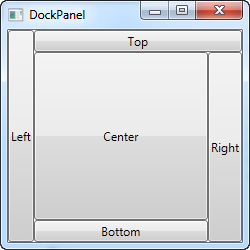
Net zoals vele andere panelen in WPF kan je gebruik beginnen maken van de paneel mogelijkheden door een aanhangend eigenschap of 'property' te gebruiken, hier DockPanel.Dock, wat beslist in welke richting je het geërfde object wil koppelen. Als je dit niet gebruikt zal het eerste object of objecten links gekoppeld worden, terwijl de laatste de overige ruimte zullen gebruiken. Hier volgt een voorbeeld hoe het te gebruiken valt:
<Window x:Class="WpfTutorialSamples.Panels.DockPanel"
        xmlns="http://schemas.microsoft.com/winfx/2006/xaml/presentation"
        xmlns:x="http://schemas.microsoft.com/winfx/2006/xaml"
        Title="DockPanel" Height="250" Width="250">
	<DockPanel>
		<Button DockPanel.Dock="Left">Left</Button>
		<Button DockPanel.Dock="Top">Top</Button>
		<Button DockPanel.Dock="Right">Right</Button>
		<Button DockPanel.Dock="Bottom">Bottom</Button>
		<Button>Center</Button>
	</DockPanel>
</Window>
Zoals al eerder aangegeven wijzen we geen dock positie toe aan het laatste element, omdat het automatisch in het centrum van het paneel plaats neemt en de beschikbare ruimte in neemt. Het zal je ook opvallen dat de controls rondom het centrum alleen die ruimte innemen die zij nodig hebben, alle overige ruimte blijft over voor de centrale control. Dat is ook de reden dat je ziet dat de rechter knop iets meer ruimte inneemt dan de linker knop en dat ligt puur aan het extra karakter dat nodig is voor de tekst op de knop.
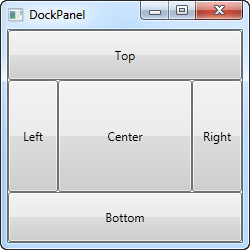
The last thing that you will likely notice, is how the space is divided. For instance, the Top button doesn't get all of the top space, because the Left button takes a part of it. The DockPanel decides which control to favor by looking at their position in the markup. In this case, the Left button gets precedence because it's placed first in the markup. Fortunately, this also means that it's very easy to change, as we'll see in the next example, where we have also evened out the space a bit by assigning widths/heights to the child controls:
<Window x:Class="WpfTutorialSamples.Panels.DockPanel"
        xmlns="http://schemas.microsoft.com/winfx/2006/xaml/presentation"
        xmlns:x="http://schemas.microsoft.com/winfx/2006/xaml"
        Title="DockPanel" Height="250" Width="250">
	<DockPanel>
		<Button DockPanel.Dock="Top" Height="50">Top</Button>
		<Button DockPanel.Dock="Bottom" Height="50">Bottom</Button>
		<Button DockPanel.Dock="Left" Width="50">Left</Button>
		<Button DockPanel.Dock="Right" Width="50">Right</Button>
		<Button>Center</Button>
	</DockPanel>
</Window>
The top and bottom controls now take precedence over the left and right controls, and they're all taking up 50 pixels in either height or width. If you make the window bigger or smaller, you will also see that this static width/height remains the same no matter what - only the center area increases or decreases in size as you resize the window.
LastChildFill
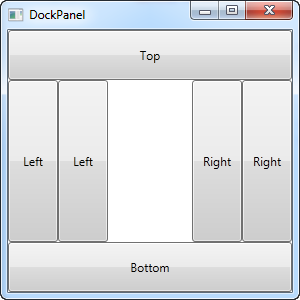
As already mentioned, the default behavior is that the last child of the DockPanel takes up the rest of the space, but this can be disabled using the LastChildFill. Here's an example where we disable it, and at the same time we'll show the ability to dock more than one control to the same side:
<Window x:Class="WpfTutorialSamples.Panels.DockPanel"
        xmlns="http://schemas.microsoft.com/winfx/2006/xaml/presentation"
        xmlns:x="http://schemas.microsoft.com/winfx/2006/xaml"
        Title="DockPanel" Height="300" Width="300">
	<DockPanel LastChildFill="False">
		<Button DockPanel.Dock="Top" Height="50">Top</Button>
		<Button DockPanel.Dock="Bottom" Height="50">Bottom</Button>
		<Button DockPanel.Dock="Left" Width="50">Left</Button>
		<Button DockPanel.Dock="Left" Width="50">Left</Button>
		<Button DockPanel.Dock="Right" Width="50">Right</Button>
		<Button DockPanel.Dock="Right" Width="50">Right</Button>
	</DockPanel>
</Window>
In this example, we dock two controls to the left and two controls to the right, and at the same time, we turn off the LastChildFill property. This leaves us with empty space in the center, which may be preferable in some cases.