This article is currently in the process of being translated into Dutch (~55% done).
Inleiding op WPF-stijlen
Als je uit de wereld van webontwerp komt, gebruik makend van HTML en CSS, zul je jezelf snel realiseren dat XAML veel overeenkomsten heeft met HTML: door tags te gebruiken, definieer je het structurele ontwerp van jouw applicatie. Je kunt de elementen zelfs een bepaalde look geven, door inline eigenschappen te gebruiken zoals Foreground, FontSizet etc., hetzelfde als je HTML tags lokaal kunt stileren.
Maar wat gebeurt er wanneer je exact dezelfde font grootte en kleur wilt gebruiken op drie verschillende TextBlock controls? Je kunt de gewenste eigenschappen kopiëren en plakken naar ieder TextBlock, maar wat als het dan 50 controls worden, verspreid over verschillende vensters? En wat gebeurt er wanneer je je realiseert dat de font grootte 14 moet zijn in plaats van 12?
WPF introduceert styling, dat voor XAML hetzelfde is als CSS voor HTML. Door gebruik te maken van styling, kun je een set van eigenschappen groeperen en deze groep toewijzen aan specifieke controls of alle controls van een specifiek type. En net als bij CSS, kan een style overerven van een andere style.
Basis style voorbeeld
We zullen veel meer over de details praten, maar voor dit introductie hoofdstuk, wil ik je een heel eenvoudig voorbeeld tonen over hoe styling te gebruiken:
<Window x:Class="WpfTutorialSamples.Styles.SimpleStyleSample"
        xmlns="http://schemas.microsoft.com/winfx/2006/xaml/presentation"
        xmlns:x="http://schemas.microsoft.com/winfx/2006/xaml"
        Title="SimpleStyleSample" Height="200" Width="250">
    <StackPanel Margin="10">
        <StackPanel.Resources>
            <Style TargetType="TextBlock">
                <Setter Property="Foreground" Value="Gray" />
                <Setter Property="FontSize" Value="24" />
            </Style>
        </StackPanel.Resources>
        <TextBlock>Header 1</TextBlock>
        <TextBlock>Header 2</TextBlock>
        <TextBlock Foreground="Blue">Header 3</TextBlock>
    </StackPanel>
</Window>
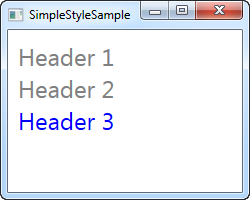
For the resources of my StackPanel, I define a Style. I use the TargetType property to tell WPF that this style should be applied towards ALL TextBlock controls within the scope (the StackPanel), and then I add two Setter elements to the style. The Setter elements are used to set specific properties for the target controls, in this case Foreground and FontSize properties. The Property property tells WPF which property we want to target, and the Value property defines the desired value.
Notice that the last TextBlock is blue instead of gray. I did that to show you that while a control might get styling from a designated style, you are completely free to override this locally on the control - values defined directly on the control will always take precedence over style values.
Samenvatting
WPF styles make it very easy to create a specific look and then use it for several controls, and while this first example was very local, I will show you how to create global styles in the next chapters.