This article is currently in the process of being translated into Slovak (~28% done).
The Image control
WPF ovládací prvok Image vám umožňuje zobraziť obrázky vo vašich aplikáciách. Je to veľmi univerzálne kontrola s mnohými užitčnými možnosťami a metódami, ako sa ja dozviete v tomto článku. Najprv však uvidíme najjednoduchší príklad zahrňujúci obrázok vo vnútri okna:
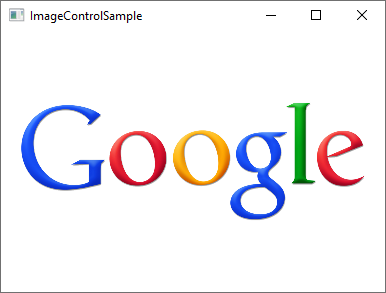
<Image Source="https://upload.wikimedia.org/wikipedia/commons/3/30/Googlelogo.png" />Výsledok vyzerá takto:

Vlastnosť Source, ktorú sme v tomto príklade použili na špecifikáciu obrázka, ktorý by sa mal zobraziť, je pravdepodobne najdôležitejšou vlastnosťou tohto ovládacieho prvku, takže s ňou začnime.
Vlastnosť Source
Ako môžete vidieť z prvého príkladu, vlastnosť Source umožňuje ľahko špecifikovať ktorý obrázok sa má zobraziť v kontrolke Image – v tomto konkrétnom príklade sme použili „vzdialený“ obrázok, ktorý kontrolka Image automatický zobrazí, hneď ako sa stane viditeľným. Je to dobrý príklad toho ako je kontrolka Image univerzálna, ale v mnohých situáciách budete chcieť zviazať obrázky s aplikáciou, namiesto načítania obrázkov zo vzdialeného zdroja. To sa dá dosiahnuť rovnako ľahko.
Ako pravdepodobne viete, môžete do svojho projektu pridávať zdrojové súbory – môžu byť vo vašom projekte vo Visual Studiu a budú viditeľné v prieskumníkovi riešení ako iné súbory súvisiace s WPF (Okná, užívateľské kontrolky, atď). Náležitým príkladom zdrojového súboru je obrázok, ktorý môžete jednoducho skopírovať do príslušného adresára vášho projektu. Potom sa skompiluje do vašej aplikácie (pokiaľ špeciálne nepožiadate VS aby to nerobilo) a potom k nemu môžete pristupoval pomocou URL formátu pre zdroje. Ak sa máte obrázok s názvom "google.png" v adresári nazvanom "Images", syntax môže vyzerať takto:
<Image Source="/WpfTutorialSamples;component/Images/google.png" />These URI's, often referred to as "Pack URI's", are a heavy topic with a lot more details, but for now, just notice that it's essentially made up of two parts:
- The first part (/WpfTutorialSamples;component), where the assembly name (WpfTutorialSamples in my application) is combined with the word "component"
- The second part, where the relative path of the resource is specified: /Images/google.png
Using this syntax, you can easily reference resources included in your application. To simplify things, the WPF framework will also accept a simple, relative URL - this will suffice in most cases, unless you're doing something more complicated in your application, in regards to resources. Using a simple relative URL, it would look like this:
<Image Source="/Images/google.png" />Loading images dynamically (Code-behind)
Specifying the Image Source directly in your XAML will work out for a lot of cases, but sometimes you need to load an image dynamically, e.g. based on a user choice. This is possible to do from Code-behind. Here's how you can load an image found on the user's computer, based on their selection from an OpenFileDialog:
private void BtnLoadFromFile_Click(object sender, RoutedEventArgs e)
{
    OpenFileDialog openFileDialog = new OpenFileDialog();
    if(openFileDialog.ShowDialog() == true)
    {
    Uri fileUri = new Uri(openFileDialog.FileName);
    imgDynamic.Source = new BitmapImage(fileUri);
    }
}
Notice how I create a BitmapImage instance, which I pass a Uri object to, based on the selected path from the dialog. We can use the exact same technique to load an image included in the application as a resource:
private void BtnLoadFromResource_Click(object sender, RoutedEventArgs e)
{
    Uri resourceUri = new Uri("/Images/white_bengal_tiger.jpg", UriKind.Relative);
    imgDynamic.Source = new BitmapImage(resourceUri);
}
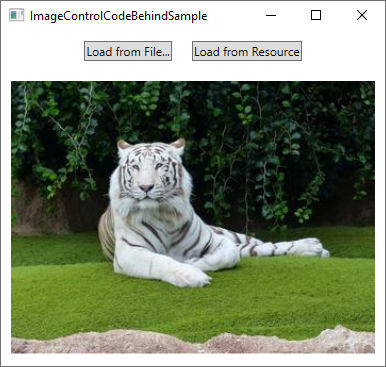
We use the same relative path as we used in one of the previous examples - just be sure to pass in the UriKind.Relative value when you create the Uri instance, so it knows that the path supplied is not an absolute path. Here's the XAML source, as well as a screenshot, of our Code-behind sample:
<Window x:Class="WpfTutorialSamples.Basic_controls.ImageControlCodeBehindSample"
    xmlns="http://schemas.microsoft.com/winfx/2006/xaml/presentation"
    xmlns:x="http://schemas.microsoft.com/winfx/2006/xaml"
    xmlns:d="http://schemas.microsoft.com/expression/blend/2008"
    xmlns:mc="http://schemas.openxmlformats.org/markup-compatibility/2006"
    xmlns:local="clr-namespace:WpfTutorialSamples.Basic_controls"
    mc:Ignorable="d"
    Title="ImageControlCodeBehindSample" Height="300" Width="400">
    <StackPanel>
    <WrapPanel Margin="10" HorizontalAlignment="Center">
        <Button Name="btnLoadFromFile" Margin="0,0,20,0" Click="BtnLoadFromFile_Click">Load from File...</Button>
        <Button Name="btnLoadFromResource" Click="BtnLoadFromResource_Click">Load from Resource</Button>
    </WrapPanel>
    <Image Name="imgDynamic" Margin="10"  />
    </StackPanel>
</Window>
The Stretch property
After the Source property, which is important for obvious reasons, I think the second most interesting property of the Image control might be the Stretch property. It controls what happens when the dimensions of the image loaded doesn't completely match the dimensions of the Image control. This will happen all the time, since the size of your Windows can be controlled by the user and unless your layout is very static, this means that the size of the Image control(s) will also change.
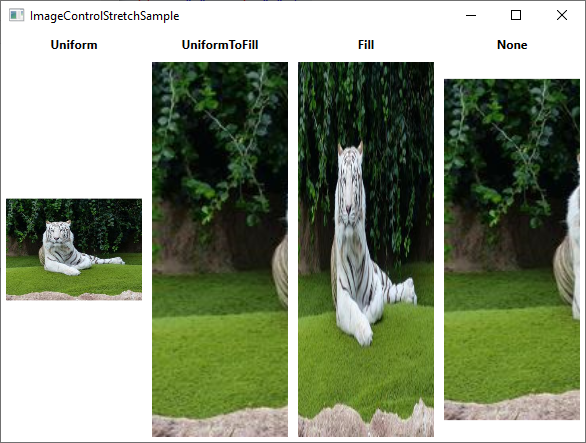
As you can see from this next example, the Stretch property can make quite a bit of difference in how an image is displayed:

<Window x:Class="WpfTutorialSamples.Basic_controls.ImageControlStretchSample"
    xmlns="http://schemas.microsoft.com/winfx/2006/xaml/presentation"
    xmlns:x="http://schemas.microsoft.com/winfx/2006/xaml"
    xmlns:d="http://schemas.microsoft.com/expression/blend/2008"
    xmlns:mc="http://schemas.openxmlformats.org/markup-compatibility/2006"
    xmlns:local="clr-namespace:WpfTutorialSamples.Basic_controls"
    mc:Ignorable="d"
    Title="ImageControlStretchSample" Height="450" Width="600">
    <Grid>
    <Grid.ColumnDefinitions>
        <ColumnDefinition Width="*" />
        <ColumnDefinition Width="*" />
        <ColumnDefinition Width="*" />
        <ColumnDefinition Width="*" />
    </Grid.ColumnDefinitions>
    <Grid.RowDefinitions>
        <RowDefinition Height="Auto" />
        <RowDefinition Height="*" />
    </Grid.RowDefinitions>
    <Label Grid.Column="0" HorizontalAlignment="Center" FontWeight="Bold">Uniform</Label>
    <Label Grid.Column="1" HorizontalAlignment="Center" FontWeight="Bold">UniformToFill</Label>
    <Label Grid.Column="2" HorizontalAlignment="Center" FontWeight="Bold">Fill</Label>
    <Label Grid.Column="3" HorizontalAlignment="Center" FontWeight="Bold">None</Label>
    <Image Source="/Images/white_bengal_tiger.jpg" Stretch="Uniform" Grid.Column="0" Grid.Row="1" Margin="5" />
    <Image Source="/Images/white_bengal_tiger.jpg" Stretch="UniformToFill" Grid.Column="1" Grid.Row="1" Margin="5" />
    <Image Source="/Images/white_bengal_tiger.jpg" Stretch="Fill" Grid.Column="2" Grid.Row="1" Margin="5" />
    <Image Source="/Images/white_bengal_tiger.jpg" Stretch="None" Grid.Column="3" Grid.Row="1" Margin="5" />
    </Grid>
</Window>
It can be a bit hard to tell, but all four Image controls display the same image, but with different values for the Stretch property. Here's how the various modes work:
- Uniform: This is the default mode. The image will be automatically scaled so that it fits within the Image area. The Aspect ratio of the image will be preserved.
- UniformToFill: The image will be scaled so that it completely fills the Image area. The Aspect ratio of the image will be preserved.
- Fill: The image will be scaled to fit the area of the Image control. Aspect ratio might NOT be preserved, because the height and width of the image are scaled independently.
- None: If the image is smaller than the Image control, nothing is done. If it's bigger than the Image control, the image will simply be cropped to fit into the Image control, meaning that only part of it will be visible.
Summary
The WPF Image control makes it easy for you to display an image in your application, whether from a remote source, an embedded resource or from the local computer, as demonstrated in this article.