This article is currently in the process of being translated into Polish (~51% done).
Kontrolka ComboBox
Kontrolka ComboBox jest pod wieloma względami podobna do kontroli ListBox, ale zajmuje dużo mniej miejsca, ponieważ lista przedmiotów jest ukryta, gdy nie jest potrzebna. Kontrolka ComboBox jest używana w wielu miejscach w Windows, ale aby mieć pewność, że każdy wie jak to wygląda i działa, przyjrzymy się temu prostemu przykładowi:
<Window x:Class="WpfTutorialSamples.ComboBox_control.ComboBoxSample"
        xmlns="http://schemas.microsoft.com/winfx/2006/xaml/presentation"
        xmlns:x="http://schemas.microsoft.com/winfx/2006/xaml"
        Title="ComboBoxSample" Height="150" Width="200">
    <StackPanel Margin="10">
        <ComboBox>
            <ComboBoxItem>ComboBox Item #1</ComboBoxItem>
            <ComboBoxItem IsSelected="True">ComboBox Item #2</ComboBoxItem>
            <ComboBoxItem>ComboBox Item #3</ComboBoxItem>
        </ComboBox>
    </StackPanel>
</Window>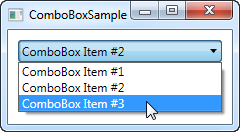
Na zrzucie ekranu uaktywniłem kontrolkę klikając w nią, co spowodowało wyświetlenie listy elementów. Jak widać z kodu, ComboBox, w swojej prostej formie, jest bardzo łatwy w użyciu. Wszystko co tutaj zrobiłem to ręczne dodanie niektórych elementów, czyniąc jeden z nich domyślnie wybranym elementem poprzez ustawienie na nim właściwości IsSelected.
Niestandardowa zwartość
W pierwszym przykładzie pokazaliśmy tylko tekst jako elementy, co jest dość powszechne w kontrolce ComboBox, ale ponieważ ComboBoxItem jest kontrolką ContentControl, w rzeczywistości możemy używać jako treści praktycznie wszystkiego. Spróbujmy zrobić nieco bardziej zaawansowaną listę elementów:
<Window x:Class="WpfTutorialSamples.ComboBox_control.ComboBoxCustomContentSample"
        xmlns="http://schemas.microsoft.com/winfx/2006/xaml/presentation"
        xmlns:x="http://schemas.microsoft.com/winfx/2006/xaml"
        Title="ComboBoxCustomContentSample" Height="150" Width="200">
    <StackPanel Margin="10">
        <ComboBox>
            <ComboBoxItem>
                <StackPanel Orientation="Horizontal">
                    <Image Source="/WpfTutorialSamples;component/Images/bullet_red.png" />
                    <TextBlock Foreground="Red">Red</TextBlock>
                </StackPanel>
            </ComboBoxItem>
            <ComboBoxItem>
                <StackPanel Orientation="Horizontal">
                    <Image Source="/WpfTutorialSamples;component/Images/bullet_green.png" />
                    <TextBlock Foreground="Green">Green</TextBlock>
                </StackPanel>
            </ComboBoxItem>
            <ComboBoxItem>
                <StackPanel Orientation="Horizontal">
                    <Image Source="/WpfTutorialSamples;component/Images/bullet_blue.png" />
                    <TextBlock Foreground="Blue">Blue</TextBlock>
                </StackPanel>
            </ComboBoxItem>
        </ComboBox>
    </StackPanel>
</Window>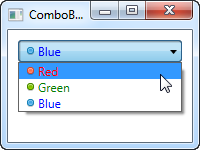
Do każdego z ComboBoxItem's dodajemy teraz StackPanel, w którym dodajemy Obrazek i TextBlock. Daje nam to pełną kontrolę nad zawartością, a także nad renderowaniem tekstu, jak widać na zrzucie ekranu, gdzie zarówno kolor tekstu, jak i obrazu wskazuje wartość koloru.
Wiązanie danych kontrolki ComboBox
Jak widać na pierwszych przykładach, ręczne definiowanie elementów sterowania ComboBoxa jest łatwe przy użyciu XAML, ale prawdopodobnie wkrótce pojawi się sytuacja, w której elementy będą musiały pochodzić z jakiegoś źródła danych, np. z bazy danych lub po prostu z listy w pamięci. Korzystając z data binding WPF i własnego szablonu, możemy w prosty sposób wyrenderować listę kolorów, włącznie z podglądem koloru:
<Window x:Class="WpfTutorialSamples.ComboBox_control.ComboBoxDataBindingSample"
        xmlns="http://schemas.microsoft.com/winfx/2006/xaml/presentation"
        xmlns:x="http://schemas.microsoft.com/winfx/2006/xaml"
        Title="ComboBoxDataBindingSample" Height="200" Width="200">
    <StackPanel Margin="10">
        <ComboBox Name="cmbColors">
            <ComboBox.ItemTemplate>
                <DataTemplate>
                    <StackPanel Orientation="Horizontal">
                        <Rectangle Fill="{Binding Name}" Width="16" Height="16" Margin="0,2,5,2" />
                        <TextBlock Text="{Binding Name}" />
                    </StackPanel>
                </DataTemplate>
            </ComboBox.ItemTemplate>
        </ComboBox>
    </StackPanel>
</Window>
using System;
using System.Collections.Generic;
using System.Windows;
using System.Windows.Media;
namespace WpfTutorialSamples.ComboBox_control
{
public partial class ComboBoxDataBindingSample : Window
{
public ComboBoxDataBindingSample()
{
InitializeComponent();
cmbColors.ItemsSource = typeof(Colors).GetProperties();
}
}
}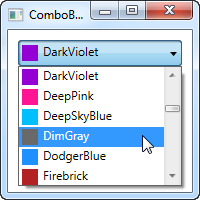
Jest to dosyć proste: w kodzie behind (Code-behind) uzyskuję listę wszystkich kolorów używając podejścia na podstawie reflekcji z klasy Colors. Przypisuję to do włąściwości ItemsSource ComboBox'a, które wtedy renderuje każdy z kolorów używając stylu w którym określiłem w części XAML.
Każdy element, określony w stylu elementu (ItemTemplate), składa się z panelu StackPanel i bloku tekstu (TextBlock), z których każdy jest powiązany z wartością koloru. To daje nam kompletną listę kolorów przy minimalnym wysiłku – i wygląda całkiem nieźle, co nie?
IsEditable
W pierwszych przykładach użytkownik mógł wybierać jedynie z listy predefiniowanych elementów. To jednak nie wyczerpuje wszystkich możliwości oferowanych przez kontrolkę ComboBox. Jedną z jej kluczowych funkcji jest możliwość nie tylko wyboru z listy, ale również ręcznego wprowadzenia wartości. Jest to niezwykle użyteczne w sytuacjach, gdy chcemy ułatwić użytkownikowi wybór, dostarczając mu listę predefiniowanych opcji, ale jednocześnie dając mu możliwość swobodnego wprowadzenia niestandardowej wartości. Możliwość ręcznego wprowadzania wartości kontrolowana jest przez właściwość IsEditable, która znacząco wpływa na zachowanie i wygląd kontrolki ComboBox.
<Window x:Class="WpfTutorialSamples.ComboBox_control.ComboBoxEditableSample"
        xmlns="http://schemas.microsoft.com/winfx/2006/xaml/presentation"
        xmlns:x="http://schemas.microsoft.com/winfx/2006/xaml"
        Title="ComboBoxEditableSample" Height="150" Width="200">
    <StackPanel Margin="10">
        <ComboBox IsEditable="True">
            <ComboBoxItem>ComboBox Item #1</ComboBoxItem>
            <ComboBoxItem>ComboBox Item #2</ComboBoxItem>
            <ComboBoxItem>ComboBox Item #3</ComboBoxItem>
        </ComboBox>
    </StackPanel>
</Window>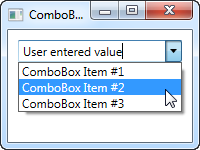
As you can see, I can enter a completely different value or pick one from the list. If picked from the list, it simply overwrites the text of the ComboBox.
As a lovely little bonus, the ComboBox will automatically try to help the user select an existing value when the user starts typing, as you can see from the next screenshot, where I just started typing "Co":
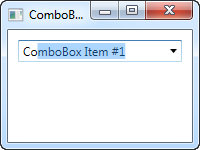
By default, the matching is not case-sensitive but you can make it so by setting the IsTextSearchCaseSensitive to True. If you don't want this auto complete behavior at all, you can disable it by setting the IsTextSearchEnabled to False.
Working with ComboBox selection
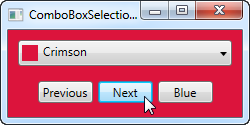
A key part of using the ComboBox control is to be able to read the user selection, and even control it with code. In the next example, I've re-used the data bound ComboBox example, but added some buttons for controlling the selection. I've also used the SelectionChanged event to capture when the selected item is changed, either by code or by the user, and act on it.
Here's the sample:
<Window x:Class="WpfTutorialSamples.ComboBox_control.ComboBoxSelectionSample"
        xmlns="http://schemas.microsoft.com/winfx/2006/xaml/presentation"
        xmlns:x="http://schemas.microsoft.com/winfx/2006/xaml"
        Title="ComboBoxSelectionSample" Height="125" Width="250">
    <StackPanel Margin="10">
        <ComboBox Name="cmbColors" SelectionChanged="cmbColors_SelectionChanged">
            <ComboBox.ItemTemplate>
                <DataTemplate>
                    <StackPanel Orientation="Horizontal">
                        <Rectangle Fill="{Binding Name}" Width="16" Height="16" Margin="0,2,5,2" />
                        <TextBlock Text="{Binding Name}" />
                    </StackPanel>
                </DataTemplate>
            </ComboBox.ItemTemplate>
        </ComboBox>
        <WrapPanel Margin="15" HorizontalAlignment="Center">
            <Button Name="btnPrevious" Click="btnPrevious_Click" Width="55">Previous</Button>
            <Button Name="btnNext" Click="btnNext_Click" Margin="5,0" Width="55">Next</Button>
            <Button Name="btnBlue" Click="btnBlue_Click" Width="55">Blue</Button>
        </WrapPanel>
    </StackPanel>
</Window>
using System;
using System.Collections.Generic;
using System.Reflection;
using System.Windows;
using System.Windows.Media;
namespace WpfTutorialSamples.ComboBox_control
{
public partial class ComboBoxSelectionSample : Window
{
public ComboBoxSelectionSample()
{
InitializeComponent();
cmbColors.ItemsSource = typeof(Colors).GetProperties();
}
private void btnPrevious_Click(object sender, RoutedEventArgs e)
{
if(cmbColors.SelectedIndex > 0)
cmbColors.SelectedIndex = cmbColors.SelectedIndex - 1;
}
private void btnNext_Click(object sender, RoutedEventArgs e)
{
if(cmbColors.SelectedIndex < cmbColors.Items.Count-1)
cmbColors.SelectedIndex = cmbColors.SelectedIndex + 1;
}
private void btnBlue_Click(object sender, RoutedEventArgs e)
{
cmbColors.SelectedItem = typeof(Colors).GetProperty("Blue");
}
private void cmbColors_SelectionChanged(object sender, System.Windows.Controls.SelectionChangedEventArgs e)
{
Color selectedColor = (Color)(cmbColors.SelectedItem as PropertyInfo).GetValue(null, null);
this.Background = new SolidColorBrush(selectedColor);
}
}
}
The interesting part of this example is the three event handlers for our three buttons, as well as the SelectionChanged event handler. In the first two, we select the previous or the next item by reading the SelectedIndex property and then subtracting or adding one to it. Pretty simple and easy to work with.
In the third event handler, we use the SelectedItem to select a specific item based on the value. I do a bit of extra work here (using .NET reflection), because the ComboBox is bound to a list of properties, each being a color, instead of a simple list of colors, but basically it's all about giving the value contained by one of the items to the SelectedItem property.
In the fourth and last event handler, I respond to the selected item being changed. When that happens, I read the selected color (once again using Reflection, as described above) and then use the selected color to create a new background brush for the Window. The effect can be seen on the screenshot.
If you're working with an editable ComboBox (IsEditable property set to true), you can read the Text property to know the value the user has entered or selected.