This article is currently in the process of being translated into Polish (~23% done).
Anulowanie pracy BackgroundWorker
As we saw in the previous article, the multi-threading has the added advantage of being able to show progress and not having your application hang while performing time-consuming operation.
Another problem you'll face if you perform all the work on the UI thread is the fact that there's no way for the user to cancel a running task - and why is that? Because if the UI thread is busy performing your lengthy task, no input will be processed, meaning that no matter how hard your user hits a Cancel button or the Esc key, nothing happens.
Fortunately for us, the BackgroundWorker is built to make it easy for you to support progress and cancellation, and while we looked at the whole progress part in the previous chapter, this one will be all about how to use the cancellation support. Let's jump straight to an example:
<Window x:Class="WpfTutorialSamples.Misc.BackgroundWorkerCancellationSample"
        xmlns="http://schemas.microsoft.com/winfx/2006/xaml/presentation"
        xmlns:x="http://schemas.microsoft.com/winfx/2006/xaml"
        Title="BackgroundWorkerCancellationSample" Height="120" Width="200">
    <StackPanel VerticalAlignment="Center" HorizontalAlignment="Center">
        <TextBlock Name="lblStatus" HorizontalAlignment="Center" Margin="0,10" FontWeight="Bold">Not running...</TextBlock>
        <WrapPanel>
            <Button Name="btnStart" Width="60" Margin="10,0" Click="btnStart_Click">Start</Button>
            <Button Name="btnCancel" Width="60" Click="btnCancel_Click">Cancel</Button>
        </WrapPanel>
    </StackPanel>
</Window>
using System;
using System.ComponentModel;
using System.Windows;
using System.Windows.Media;
namespace WpfTutorialSamples.Misc
{
public partial class BackgroundWorkerCancellationSample : Window
{
private BackgroundWorker worker = null;
public BackgroundWorkerCancellationSample()
{
InitializeComponent();
worker = new BackgroundWorker();
worker.WorkerSupportsCancellation = true;
worker.WorkerReportsProgress = true;
worker.DoWork += worker_DoWork;
worker.ProgressChanged += worker_ProgressChanged;
worker.RunWorkerCompleted += worker_RunWorkerCompleted;
}
private void btnStart_Click(object sender, RoutedEventArgs e)
{
worker.RunWorkerAsync();
}
private void btnCancel_Click(object sender, RoutedEventArgs e)
{
worker.CancelAsync();
}
void worker_DoWork(object sender, DoWorkEventArgs e)
{
for(int i = 0; i <= 100; i++)
{
if(worker.CancellationPending == true)
{
e.Cancel = true;
return;
}
worker.ReportProgress(i);
System.Threading.Thread.Sleep(250);
}
e.Result = 42;
}
void worker_ProgressChanged(object sender, ProgressChangedEventArgs e)
{
lblStatus.Text = "Working... (" + e.ProgressPercentage + "%)";
}
void worker_RunWorkerCompleted(object sender, RunWorkerCompletedEventArgs e)
{
if(e.Cancelled)
{
lblStatus.Foreground = Brushes.Red;
lblStatus.Text = "Cancelled by user...";
}
else
{
lblStatus.Foreground = Brushes.Green;
lblStatus.Text = "Done... Calc result: " + e.Result;
}
}
}
}
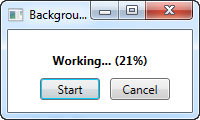
Tak więc XAML jest bardzo prosty - wyłacznie label który pokazuje aktualny status a także dwa przyciski które służą do startu i anulowania naszego workera.
In Code-behind, we start off by creating the BackgroundWorker instance. Pay special attention to the WorkerSupportsCancellation and WorkerReportsProgress properties which we set to true - without that, an exception will be thrown if we try to use these features.
Przycisk Cancel wywołuje metodę CancelAsync() - daje to sygnał do BackgroundWorker, że użytkownik chce przerwać uruchomiony proces poprzez ustawienie właściwości CancellationPending na wartość true, ale to jest wszystko co możesz zrobić z wątku UI - reszta będzie musiała być zrobiona wewnątrz zdarzenia DoWork
W zdarzeniu DoWork odliczamy do 100 z opóźnieniem 250 milisekund w każdej iteracji. Da nam to ładne i długotrwałe zadanie które zwraca postępy działania i nadal będziemy mieć czas na wciśnięcie przycisku Cancel.
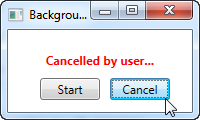
Notice how I check the CancellationPending property on each iteration - if the worker is cancelled, this property will be true and I will have the opportunity to jump out of the loop. I set the Cancel property on the event arguments, to signal that the process was cancelled - this value is used in the RunWorkerCompleted event to see if the worker actually completed or if it was cancelled.
In the RunWorkerCompleted event, I simply check if the worker was cancelled or not and then update the status label accordingly.

Podsumowanie
So to sum up, adding cancellation support to your BackgroundWorker is easy - just make sure that you set WorkerSupportsCancellation property to true and check the CancellationPending property while performing the work. Then, when you want to cancel the task, you just have to call the CancelAsync() method on the worker and you're done.